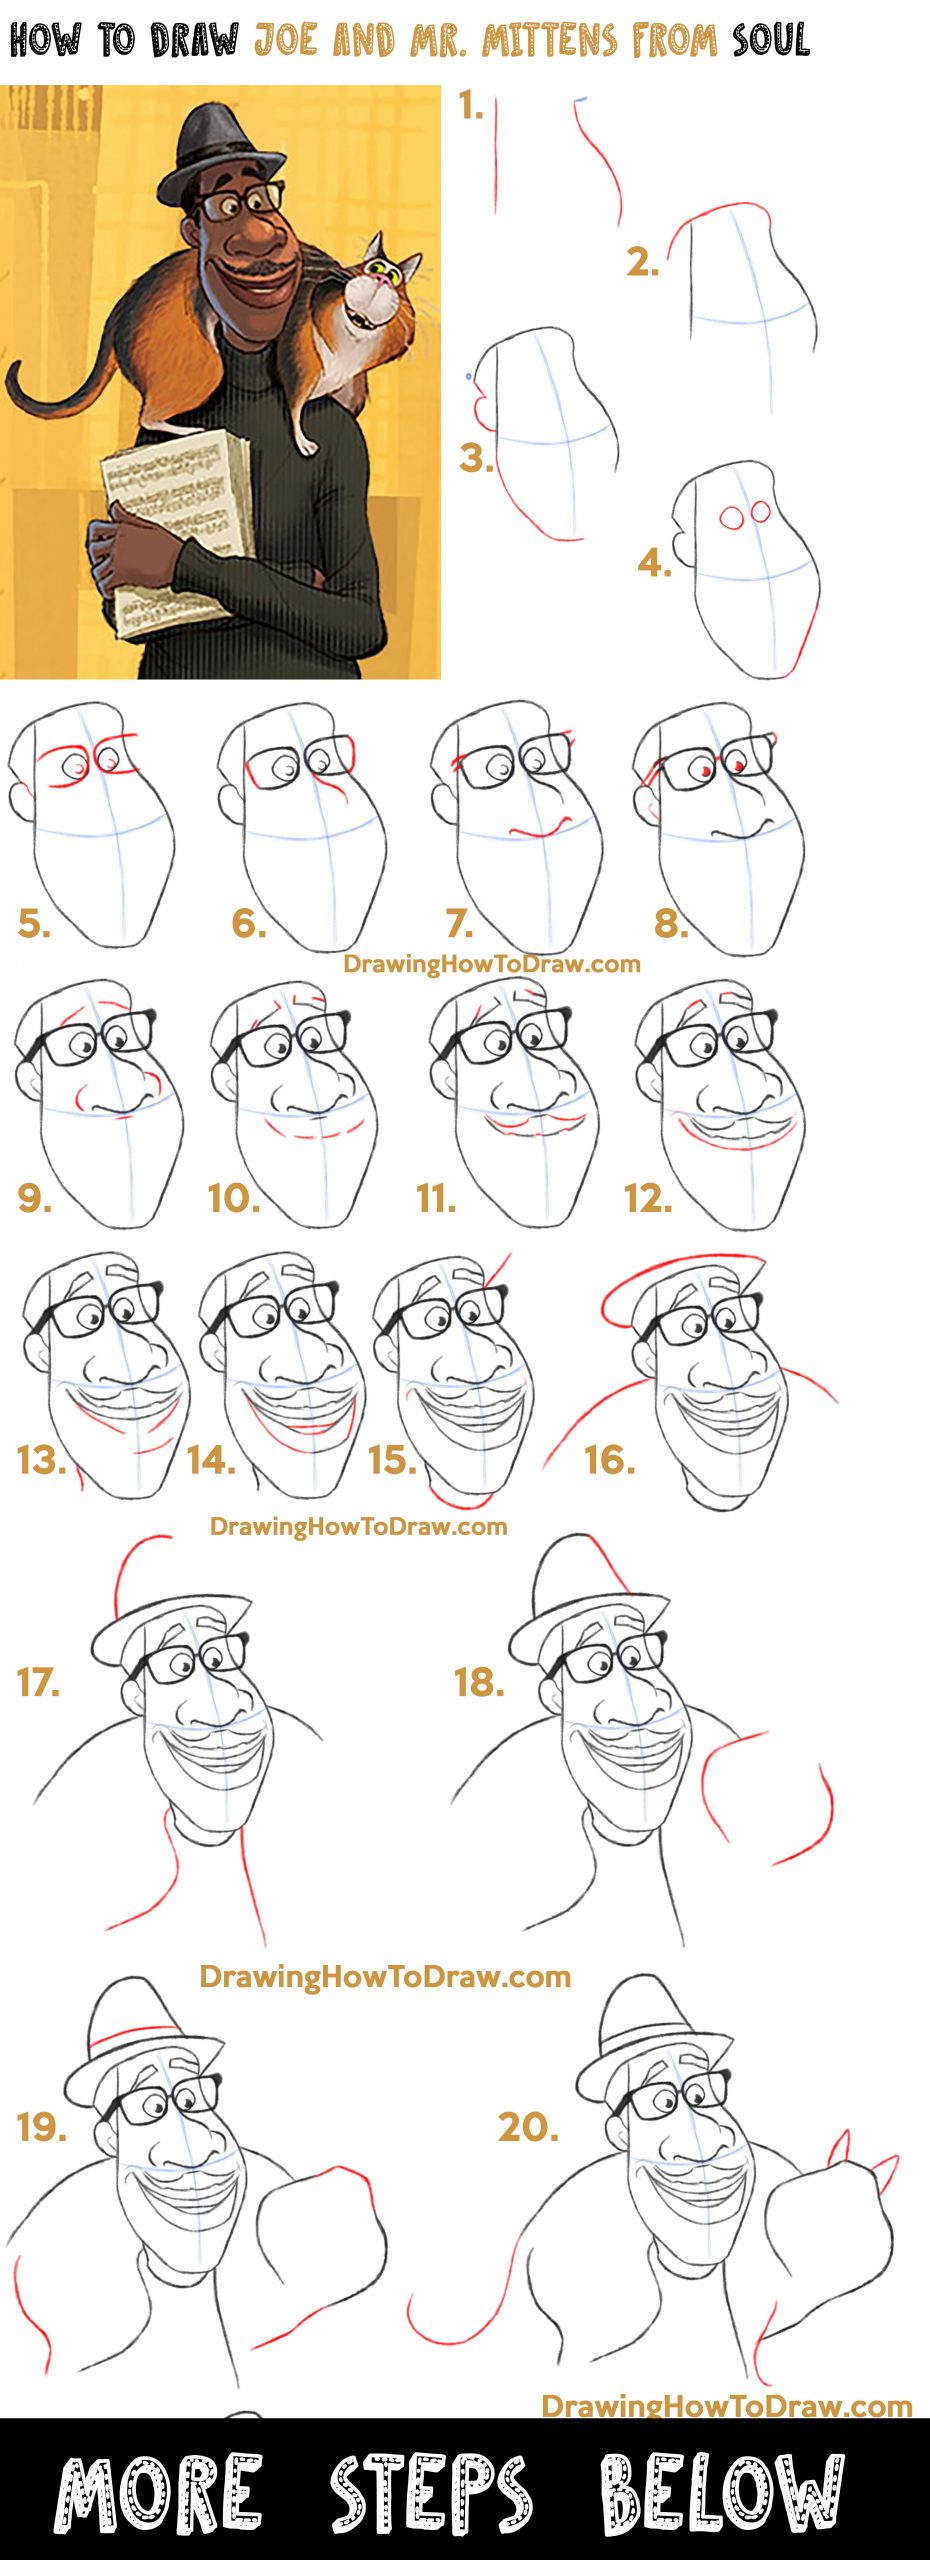
Today I will show you how to draw Joe Gardner and his cute little cat (Mr. Mittens) from Pixar’s Soul. This is a great movie, so if you haven’t seen it, I recommend that you find it and watch it. I have broken down this drawing tutorial into more than 30 steps to make it as easy as possible to follow along with. Have fun and Happy Drawing!
Learn How to Draw Joe Gardner and Mr. Mittens the Cat from Pixar’s Soul Easy Step by Step Drawing Tutorial
[ad#draw]
Written-Out Step by Step Drawing Instructions
(STEP 01) Let’s start drawing Joe’s face. Draw what looks like a #15 (although don’t draw the blue part of the line).
(STEP 02) Draw a sideways “J” shape on top of the head. Lightly draw guidelines within the face. These guides will be erased later on.
(STEP 03) Draw the left side of the chin. Draw an upside-down “?” for the left ear.
(STEP 04) Draw the right side of Joe’s chin. Draw circle-like shapes for his eyes.
(STEP 05) Draw a wavy line on the ear. Draw a “C” shape in each eye. Draw sideways “U” shapes for the lenses of his glasses.
(STEP 06) Draw the sides of Joe’s glasses. Draw an “S” curve for his nose.
(STEP 07) Draw 2 lines on both sides of his glasses. Draw a sideways #3-like shape for the bottom of his nose.
(STEP 08) Draw an upside “J” shape in his ear. Fill in the pupils. Draw 2 long lines for the arm of the glasses. Draw a line in the center of the glasses. Draw a curved line on the right side of the glasses.
(STEP 09) Draw slanted lines over his eyes for his eyebrows. Draw a curved line on both sides of his nose and a line underneath it.
(STEP 10) Draw lines on his brows. Draw curved lines for his mustache.
(STEP 11) Add to the brows again. Draw some curved lines on his mustache.
(STEP 12) Add again to the brows as well as his lips.
(STEP 13) Draw some lines below and on his mouth. Draw an “S” curve for part of his neck.
(STEP 14) Add a bunch of lines to his mouth.
(STEP 15) Draw lines around the mouth, on his neck, and on his forehead.
(STEP 16) Draw a sideways “J” shape on the hat. Draw curved lines on his shoulders.
(STEP 17) Draw an upside-down “J” shape on his hat. Draw an “S” shape and a line around his neck.
(STEP 18) Draw a line on the hat. Draw 2 curved lines to form a sort of square (for the cat’s face).
(STEP 19) Draw a curved line in his hat. Draw the top of the cat’s head. Draw a wavy line on his neck. Draw a backward #2 shape for his back thigh.
(STEP 20) Draw 2 “J” shapes for his leg and tail. Draw “V”-like shaped ears.
(STEP 21) Draw a “J” shape on his tail. Draw some curved and straight lines. Also, draw a “U” shape on his forehead.
(STEP 22) Add details to the cat’s nose and what lies above and below it. Draw a sideways “?”-like shape for part of his mouth. Draw a line on his front foot.
(STEP 23) Connect some of the lines with curved lines.
(STEP 24) Draw oval-ish shapes in the eyes. Draw curved lines for the mouth.
(STEP 25) Draw some lines to start off the cat’s teeth.
(STEP 26) Draw some slanted lines on the teeth.
(STEP 27) Finish up the mouth and teeth of the cat.
(STEP 28) Draw a little patch on the cat. Draw a “?” shaped shoulder, and add some more lines to the arm.
(STEP 29) Add more lines to the arm/sleeve. Start drawing the hand with an “S” curve and a line.
(STEP 30) Draw curved lines on the shirt and for where the knuckles will be on the hand. Draw some lines for his fingers.
(STEP 31) Draw some lines on the shirt for wrinkles and creases. Add to the fingers.
(STEP 32) Draw a rectangle and sort of outline it on the right. Add lines on the fingers.
(STEP 33) Add to the papers that he is holding. Also, add to the cat.
(STEP 34) Draw an “M” shape, some straight lines, and a curved line on the papers. Draw a wavy line on the cat’s back paw.
(STEP 35) Finish up the cat’s back paw. Draw curved lines on his front paw. Draw a “T” shape on his back sleeve and a “J” shape for one of his fingers. Draw the sides of his shirt.
(STEPS 36 – 37) Finish things up.


