Today I am going to show you how to draw a tulip from above, from the front / side, and as a young bud that hasn’t yet blossomed. I have broken down this tutorial into many, many steps to make it as easy as possible. If you want to learn how to draw flowers, tulips are a great place to start. Have fun and happy drawing!
Here are more Flower Drawing Tutorials
Learn How to Draw Tulips – Easy Step by Step Drawing Tutorial from Side, From Above and as Young Buds
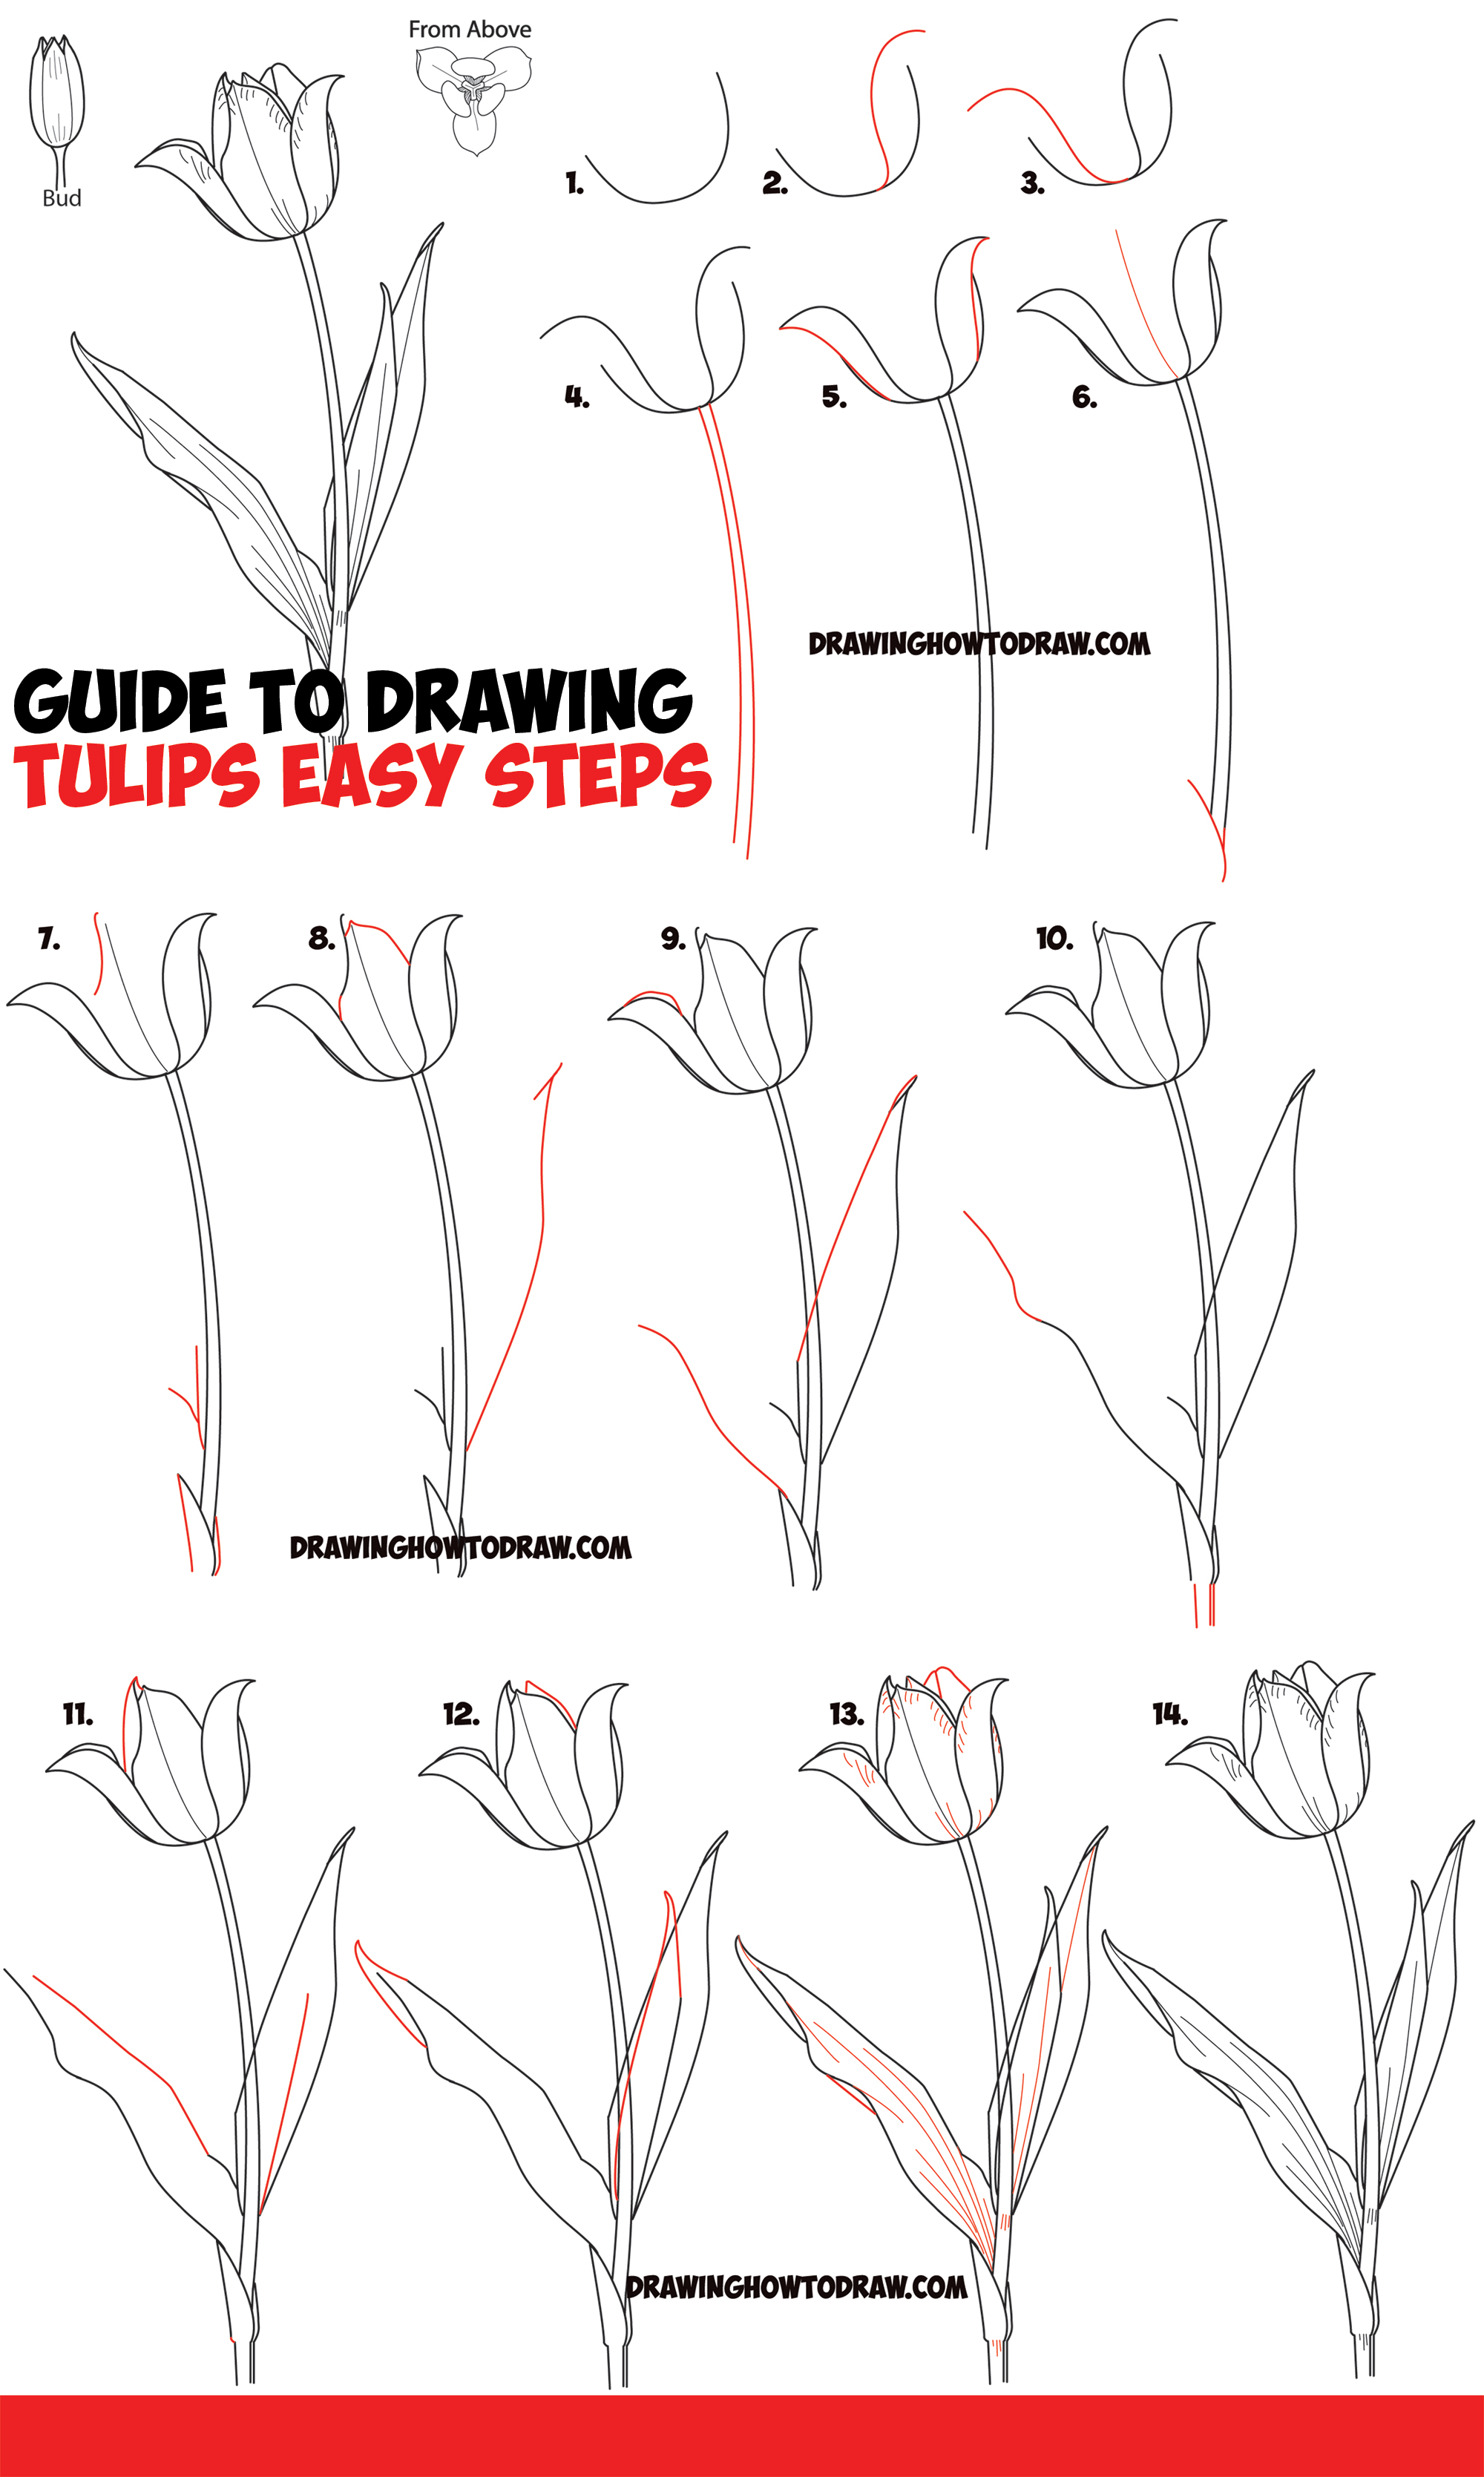
How to Draw Tulips from the Front
Written-Out Step by Step Instructions for Drawing Tulips from the Front
(Step 1) Draw a letter ‘U’ shape for the bottom of the tulip.
(Step 2) Draw a letter ‘s’-like shape.
(Step 3) Draw a backwards letter ‘s’-like shape.
(Step 4) Draw 2 curved lines for the stem.
(Step 5) Draw an upside down letter ‘j’ shape on both sides of the flower.
(Step 6) Draw a curved line in the center of the flower. Draw a curved line and a line (looks like a ‘y’) at the bottom of the flower.
(Step 7) Draw a flattened letter ‘s’-like shape at the top of the flower. Draw a letter ‘y’-like shape on the stem. Draw 2 lines at the bottom of the tulip.
(Step 8) Draw a curvier #7-like shape at the top of the flower..as well as a curved line. Draw a letter ‘T’-like shape jutting out of the right of the stem.
(Step 9) Draw a curved lien on the left-side of the tulip. For the leaves…draw a backwards, flattened letter ‘s’-like shape (on the left) and on the right, draw a line.
(Step 10) Draw an upside down ?-like shape on the leaf on the left. Draw 3 lines at the bottom of the tulip.
(Step 11) Draw a curved line that then comes downwards at the top of the flower. Draw 2 lines on the leaves and one below them.
(Step 12) Draw 3 upside down letter ‘v’-like shapes.
(Step 13) Draw a letter ‘m’-like shape at the top of the flower, and then draw a bunch of lines.
(Step 14) This is what your tulip should look like after you erase a few of the lines (in the center of the stem).
[ad#draw]
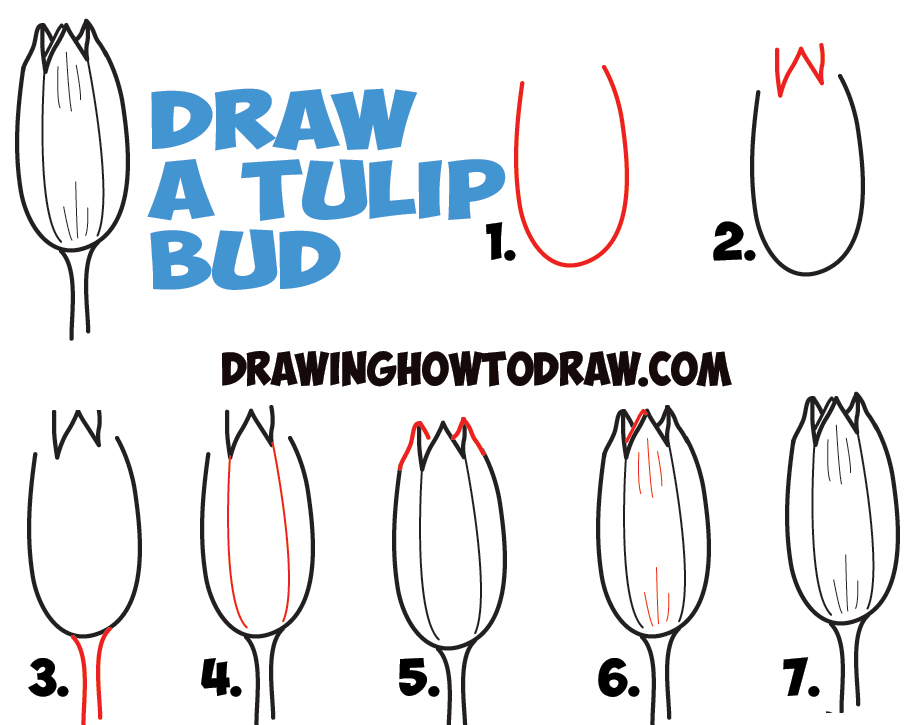
How to Draw Young Tulip Buds in Easy Steps
Written-Out Step by Step Instructions for Drawing Young Tulip Buds
(Step 1) Draw a letter ‘U’ shape.
(Step 2) Draw a letter ‘W’ shape above it.
(Step 3) Draw 2 curved lines for the stem.
(Step 4) Draw 2 inwards curved lines in the tulip.
(Step 5) Draw two check-mark -like shapes on the top.
(Step 6) Draw another check-mark-like shape on the top, then draw some lines.
(Step 7) Your bud is done.
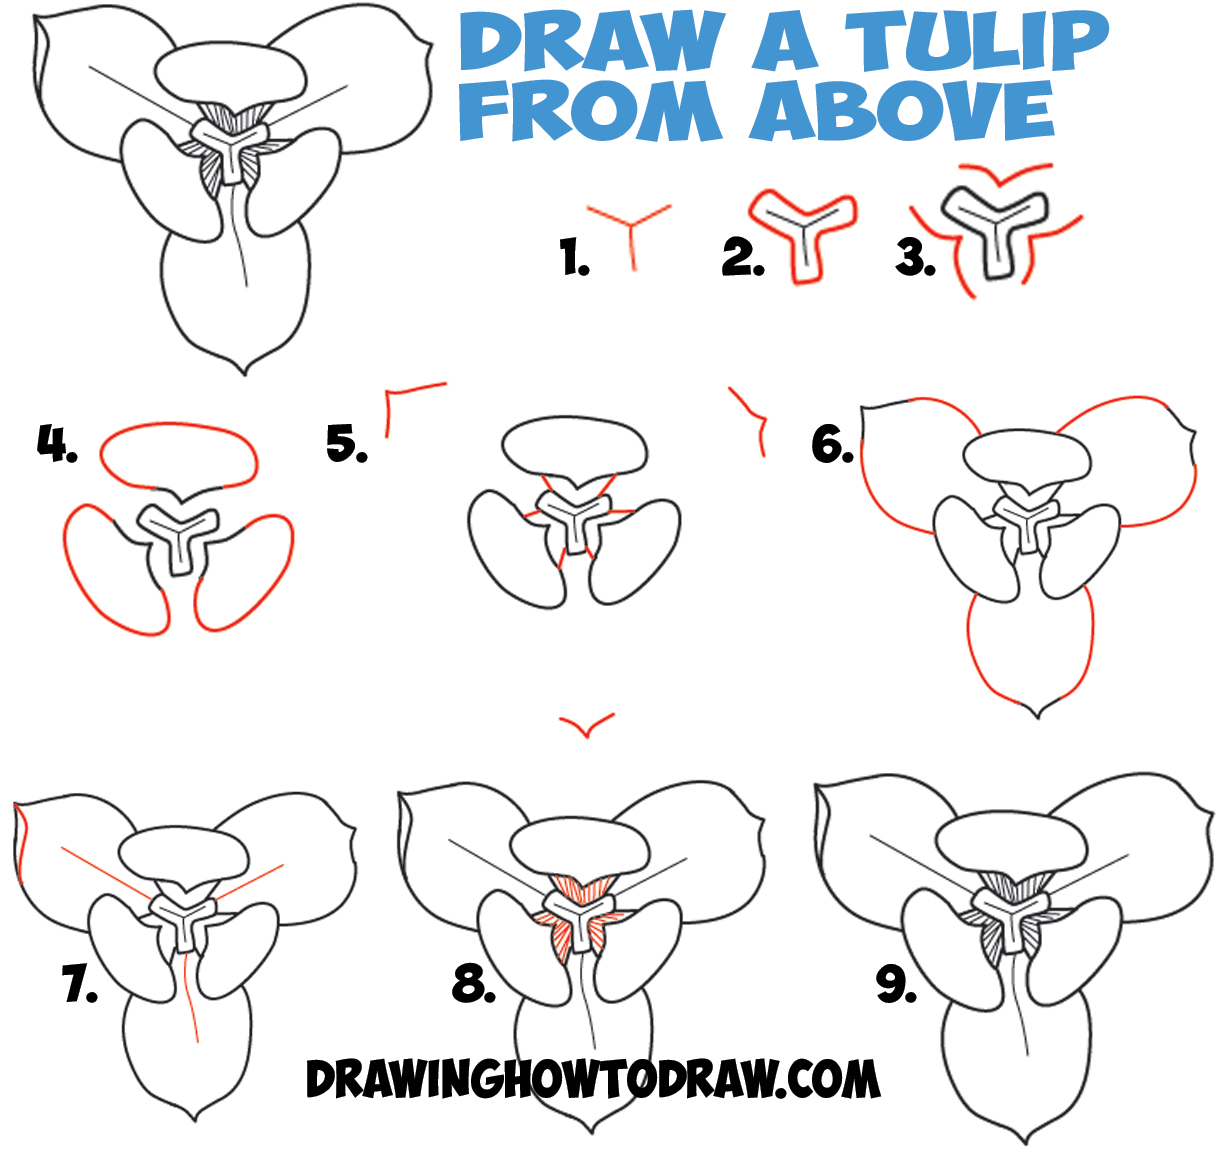
How to Draw Tulips from Above in Aerial View
Written-Out Step by Step Instructions for Drawing a Tulip from Above
(Step 1) Draw a letter ‘Y’ shape.
(Step 2) Outline the letter ‘Y’ shape.
(Step 3) Draw curved letter ‘v’ shapes around the center.
(Step 4) Draw sideways letter ‘C’ shapes on each of the ‘v’ shapes from the last step.
(Step 5) Draw 2 lines connecting each oval-ish shape to the center. Then draw a curvy letter ‘v’ shape on 3 corners of the flower.
(Step 6) Connect the ‘v’ shapes to the center with 2 curved lines each.
(Step 7) Draw 3 lines in each of the outer leaves you just drew. Draw a #7 shape on the left-most leaf.
(Step 8) Draw a bunch of lines.
(Step 9) Your tulip from above is finished.
Here are more Flower Drawing Tutorials
Technorati Tags: tulips, tulip, how to draw a tulip, how to draw tulips, how to draw tulip buds, how to draw tulips from above, how to draw flowers, flowers, drawing flowers, easy


Love your flower tutorials. I couldn’t draw a straight line with a ruler and now I can draw flowers! Not bad for a 70 yr old.
after watching the video 3 times I got a perfect flower made from my wonderful hand and used this as a logo for my bakery
have been trying to draw tulips for years thank you for the very easy to follow instructions
regards jennifer
Have been enjoying doing flowers but struggle with some types . Showing how to tulips step by step was very helpful for me ! Thank you . I’m sure it will take some practice but very useful !
