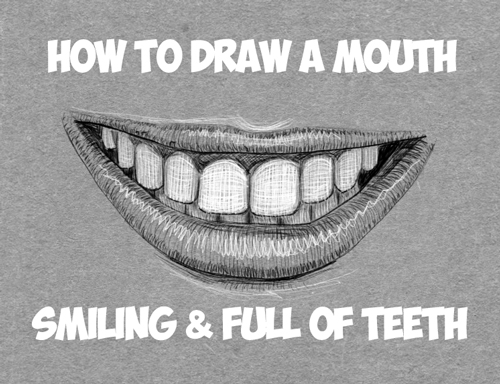

Today I will show you how to draw realistic teeth, lips, and mouth. This is a female mouth, smiling, full of glowing teeth. I will guide you through the steps with over 20 steps, so you are getting good visuals while you learn how to draw. Have fun!
(Step 1) Start constructing the mouth with a slightly curved line.
(Step 2) Draw the ‘m’ shaped part of the mouth.
(Step 3) Draw lines down to corners of mouth. Draw a curved line at bottom of mouth.
(Step 4) Draw curved lines up towards sides of mouth. Draw a line for the top of the bottom lip.
(Step 5) Draw lines up towards the corners of the mouth.
(Step 6) Draw lines to connect everything together.
(Step 7) Lightly draw guidelines for the teeth.
(Step 8) Lightly draw lines for the teeth…teeth appear smaller as you go further back into the mouth…this is a matter of perspective as things look smaller as they get farther away.
(Step 9) Use the guidelines to help you start drawing the teeth. The tops of the teeth are upside down letter ‘u’-like shapes.
(Step 10) Draw lines for sides of teeth.
(Step 11) Draw bottom of teeth…they aren’t just rectangle bottoms….the sort of curve at edges. Look closely at my picture so you can see what I mean. Or even look in a mirror if it helps you.
(Step 12) Now draw lines for the bottom teeth. The middle line is the same as the top teeth’s middle line…but most of the other lines don’t correspond with the upper teeth. Look closely at my picture.
(Step 13) Start shading upper lip. I am using hatching and cross-hatching…meaning instead of just laying color down, instead I am using lines that are varying distances apart to show shade. The lips are sort of like cylinders, so my shading lines are curved lines…take a look at my picture to see what I am talking about.
(Step 14) The upper and lower part of the lip is more shaded so I added lines that are closer together on the top and bottom part of the lip, so that they appear darker.
(Step 15) I used some white to add highlight.
(Step 16) I added some hatching to bottom lip, just like I did with the upper lip. I also added some shading to tops of the teeth and to the back of the mouth where it is very dark.
(Step 17) The upper and lower part of the bottom lip is darker, so just like I did in the upper lip, I added more lines to these sections to make them appear darker.
(Step 18) I added slight shading to bottom teeth as the upper teeth are casting shadows upon them. They should not be as dark as the lips…they are still might brighter than the lips as they are white and the lips are red.
(Step 19) Add some shading to the upper gum…also add some white to the lower teeth.
(Step 20) Start adding white to the upper teeth. I used downwards (vertical) Lines of white. Also add white highlights to bottom lip and below the lip as well.
(Step 21) I added more white to teeth, this time cross-hatching by adding white horizontally. I also added shadows to bottom of lip and below the lip as well.
(Step 22) I added a bit more shading to the parts above the teeth, on the gums…and also in the back of the mouth.
Technorati Tags: teeth, how to draw teeth, mouths, how to draw mouths, lips, how to draw lips, realistic teeth, realistic mouths
Today, I'll show you how to draw a cartoon girl pointing at herself with step-by-step…
Today, I'll show you how to draw a crying cute little cartoon guy who is…
Today, I'll show you how to draw an adorably super-cute cartoon owl on a witch's…
Today I will show you how to draw a super cute baby-version of Winnie The…
Today I'll show you how to draw the famous Pusheen cat from social media, such…
Today I'll show you how to draw this super cute chibi version of Deadpool from…
View Comments
LMAO mine is so ugly idk how you did
i have did the 20 steps but it more looks like a potato like really wth is that monstruous thing