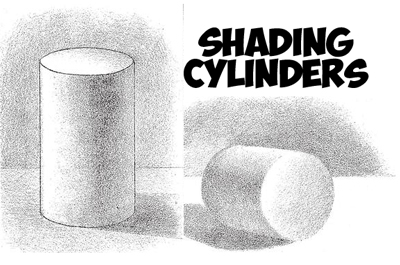
Learn how to add shadows to 3-dimensional cylinder with the following drawing lesson from a 100+ year old book. Shading cylinders never changes, so this tutorial still stands up over the years. Happy learning.


The Cylinder Standing Up
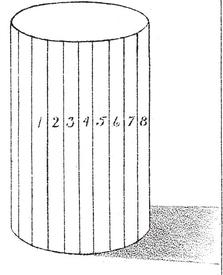
The cylinder maybe regarded as a prism with an infinite number of sides. We will suppose it to possess for our present purpose about twenty faces, of which half are seen from the front.


Now, by referring to the hexagonal prism it will be evident that if the light fall as indicated by the arrow, the faces 1, 2, 3, 4, 5, 6, 7, 8 should become darker and darker as they turn from the light. As we saw both in the cube and the hexagonal prism, the deepest shade is not on the extreme edge, because of reflection from the ground-plane, so in the cylinder we shall find the same fact repeated. But in the hexagonal prism the shades are sharply defined because of the bounding edges of their rectangular faces, while in the cylinder these (imaginary) faces blend together, so that from the extreme dark there will be an even gradation towards the light.
Step 1
(You are not to draw the faces, which are merely drawn for the purpose of illustration.) Shade the cast-shadow and background evenly. Lay the shade of a depth equal to its lightest portion, and then over this lay a gradation towards the right edge. A light line drawn down the solid will help to guide you in shading this.
Step 2
Add a slight gradation towards the highlight. (Notice that the high light runs in a line down the figure, for it really represents the imaginary face of the prism turned directly to the source of light.) The high light will not lie quite at the edge, where there is a faint tone gradated from the high light to the edge. We have seen similar instances in the cube and hexagonal prism.
Step 3
The circular end shows a gradation towards the front and just as in that solid, the edges of the tones on the sides appear slightly darker where they meet the lighter edges of the top face.
Step 4
An addition of tone to the cast-shadow and to the background along the lighter portions of the figure completes the drawing.
The Cylinder Lying Down
If the cylinder were to be placed on its side with the face marked 1 uppermost, and if, moreover, the light strike the face from above, it is clear that the other faces, 2, 3, 4, etc., should show increasing depth of shade. But a good deal of reflection from the ground-plane lights up the lower (imaginary) faces, so that the darkest portion will run some distance from the edge. The method of shading will be as before.
Step 1
Shade the cast-shadow, background, and ground-plane. Lay on the shade and add its gradations.
Step 2
Mark the line of highlight, and add a faint gradation from the edge of the shade towards it.
Step 3
The perpendicular circular end shows another gradation towards the shaded surface of the cylinder, as we have seen in the cube and hexagonal prism. Be careful to keep this much lighter than that part of the shade lit up by reflection. The broad division into the two masses of light and shade must be maintained in all cases. It will be noticed that the effects of aerial perspective are shown on the end removed from the spectator.
Technorati Tags: shading cylinders, how to shade cylinders, adding shadows to cylinders, cylinders, shading, shadows

