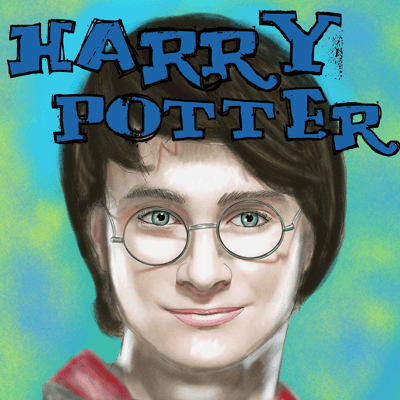

Learn how to draw Harry Potter (or Daniel Radcliffe) with the following easy step by step drawing tutorial. I will show you how to draw Harry Potter’s portrait in the following instructional steps that will guide you through the entire process.
You Might Also Like Our Other Celebrity Tutorials
You Might Also Like Our Other Harry Potter Characters
Draw a circle…cut it into half both ways. Then cut it in half again horizontally with a dash this time. Cut the bottom half in half again (vertically) with a dash. Then cut both of those halves in half again with another dash so that there are 3 dashes. Look at the diagram below to help you with this description.
Lightly draw a line from each horizontal dash that you drew. Now draw a second circle…much smaller for the lower part of the face. This one should be drawn so that it meets both of the lines that you just drew. Notice that half of this smaller circle is inside the bigger circle, and half of it is outside of this circle.
Now draw the eyes….notice that to space the eyes evenly, one eye fits in between them. Harry Potter have a very nicely even curved upper line to his eyes….notice that the inner eye is lower down than the outer eye.
Now draw the upper lid of the eye…it mirrors the upper line of the eye.
In order to help you get the right shape of the nose. First, lightly draw the 3 circles that you see above in between the 2 bottom dashes.
Now draw the lines that you see above around the circles…for the nose.
I have never drawn any person’s face who had such flat lips…normally there is more of a curve to the upper lip. Either way…draw it at the bottom of the big circle.
Now draw the bottom lip.
Now draw an oval at the bottom of the lower circle for his chin.
Now draw the sides of his face down to the chin. This isn’t a completely straight on pose of the face…that is why you see more on the left side of the face. Also draw the neck.
Start drawing the ears at the middle line that you drew in step one of this tutorial. Then draw the ears down to the middle nose area.
Now draw the glasses by drawing 2 circles around each eye….as pictured above.
Draw a circle in each eye. Then draw a smaller circle for the pupil of the eye. Draw 2 very small circles inside the pupil…then color in the rest of the pupil black…and keep those 2 small circles white for a highlight of the eye. Draw the details of the glasses too.
Now erase the parts of the eyeball that went outside the edges of the eyes.
Now draw Harry Potter’s hair.
Now here is what the drawing of Harry Potter (Daniel Radcliffe) looks like before coloring him in. I didn’t draw the scar on his forehead because I am going to put it in when I color him (as seen below)…you can just draw a capital letter ‘N’ like shape on the top left of his forehead if you don’t want to color him in.
I used pastels and Thin & Thick Pen Brush in Corel Painter to color our picture.
You Might Also Like Our Other Celebrity Tutorials
You Might Also Like Our Other Harry Potter Characters
Technorati Tags: harry potter, draw harry potter, drawing harry potter, harry potter portrait, daniel radcliffe, draw daniel radcliffe, drawing daniel radcliffe, how to draw daniel radcliffe, how to draw harry potter, harry potter drawing, harry potter drawings, harry potter drawing lessons, drawing lessons, drawing tutorials, drawing for kids, drawing people, drawing faces
Today, I'll show you how to draw a cartoon girl pointing at herself with step-by-step…
Today, I'll show you how to draw a crying cute little cartoon guy who is…
Today, I'll show you how to draw an adorably super-cute cartoon owl on a witch's…
Today I will show you how to draw a super cute baby-version of Winnie The…
Today I'll show you how to draw the famous Pusheen cat from social media, such…
Today I'll show you how to draw this super cute chibi version of Deadpool from…
View Comments
im doing this again and i still cant believe how a circle can become harry potter soo easily
thx again for the surprisingly quick and easy steps!!
Glad it works for you! yay!
OMG DAT IS ACTUALLY REALLY GOOD. Mine is sooo bad I never realised how bad I was at drawing until now.
thx so much for this mine finally looks like harry!
your instructions and drawings r great and were amazing!
I drew one of them it was insanely awesome.
Your a great artist!!!!!!!!!!!!!!!!!
I drew this and it was only a little worse than yours! Thanks so much, the ones that I tried drawing without instructions looked like a potato with glasses!! ???
:D haha, that's funny. Great job with the tutorial!
awesoooooooooooooooooooooooooome!!!!!!!!!!!!!!!!!!!!!!!
awesooooooooooooooooooooooome!!!!!!!!!!!!!!!!!!!!!!!!!!!
Coolllllllllllllllllllllllllllllllllllllllll
Harry send me a picture of yourself
And of hermione