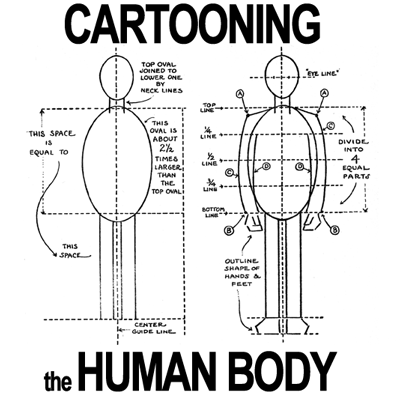

Do you want to learn how to draw the comic cartoon body? You will find it helpful to have methods and techniques to follow when drawing the human figure, so we have put together this tutorial to give you some routines to follow. With the application of a few simple rules, you will be able to create amazing cartoons and comics in no time flat. Today, I will be showing you a technique to draw a proportional cartoon figure from the front view.
When you are about to draw a comic cartoon figure, it is helpful to have certain rules of procedure in mind which you can follow. Even though cartooning is a field where a great deal of freedom is allowed, the application of a few simple rules can make the work much easier and the finished results turn out much better.
Suppose you wish to draw the front view of an average-sized comic figure that is standing still. Begin by drawing two ovals as shown in the illustration above. The top oval is for the head, which can then be finished according to the character you wish to draw (Here is a Cartoon Head / Face Drawing Tutorial). Two short lines representing the neck are drawn to connect with the larger oval below. This oval is about two and one half times the size of the head. Directly through the center, draw a guide line and on each side of this line, below the oval, draw the four lines representing the legs. Now draw a horizontal line across the figure where the two neck lines touch the oval, and another where the outside leg lines meet the oval. The distance between these two horizontal lines is equal to the length of the pants leg.
Now, divide the space between the top and bottom horizontal lines on the oval body (figure’s chest) into four equal parts by drawing three more lines across. Halfway between the top line and the next line, and slightly out from the oval on each side, place the points (AA). These indicate the outside of the shoulders which are further completed by short lines from these points to the lower ends of the neck line.
On each side of the bottom horizontal line and out from the oval directly under Point A, place another point (B) joining these two points on each side with a curved line as shown (C). Next, draw parallel lines D to complete the outlines of the arms, and, after outlining the shoes, you are ready for the next step.
After finishing the head, draw the man’s coat. Begin with the lapel, having it come to a point at the 1/4 line. Next, draw the collar and necktie. Bring in the waist-line slightly and indicate a few wrinkles, letting the coat come out to a point along the bottom, out a bit from the oval (E). Draw the outline in a curved line up to the center, (F). The lower points of the vest can be shown under the coat and, after drawing the pockets, begin with the sleeves. In the next step you will see how this is done, starting with the armpit slightly above the 3A line, indicating wrinkles properly and finally finishing with cuffs and hands.
Draw in the details of the hands. (Here is a Cartoon Hands Drawing Tutorial)
Drawing the man’s legs is simple. Note in the next step how the general outlines have a free sweeping effect. Indicate the wrinkles as shown and accentuate the baggy appearance with lines below the knee. With the finishing of the pants cuffs and the shoes (here is a cartoon foot and shoe drawing tutorial), we can then call this cartoon figure completed.
Technorati Tags: figure drawing, drawing figures, drawing body, drawing bodies, cartoon figure drawing, cartoon figures, cartoon bodies, drawing cartoon bodies, drawing cartoon body, drawing comic body, drawing comic bodies, draw comic figures, cartooning, drawing comics, how to draw, drawing lessons, drawing tutorials, drawing for kids
Today, I'll show you how to draw a cartoon girl pointing at herself with step-by-step…
Today, I'll show you how to draw a crying cute little cartoon guy who is…
Today, I'll show you how to draw an adorably super-cute cartoon owl on a witch's…
Today I will show you how to draw a super cute baby-version of Winnie The…
Today I'll show you how to draw the famous Pusheen cat from social media, such…
Today I'll show you how to draw this super cute chibi version of Deadpool from…
View Comments
This is aemaizing. Helps vary much on my art projeckt. THX XD
I love it
so much
i love it
thanks that was a amazing the owner of this must get a reward.
This website is ausume.thank so much!! :) :)
I have imagination to draw but I am now able to organize my imagination. Thanks
i love this
This was helpful. I have forgotten the proportions of the head to the torso. Thanks
Glad it helped!
thank you!! so helpful!!
Absolutely amazing! I am a 3D modeler and animator but I always have to work on the drawings (front & side) that the drawing artist does here, but with this now I can go and start making my own references for 3D modeling! Thank you very much for sharing this knowledge! :)
Oh, and I loved the "Draw While You Learn" board. Great stuff! :)
Thanks!!!I'm glad that it helped you!