Home > Drawing Lessons > Drawing Things > Decorative and Ornamental Art
Drawing Decorative and Ornamental Art
|
|
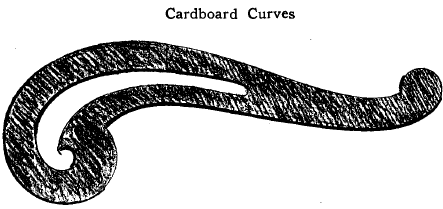
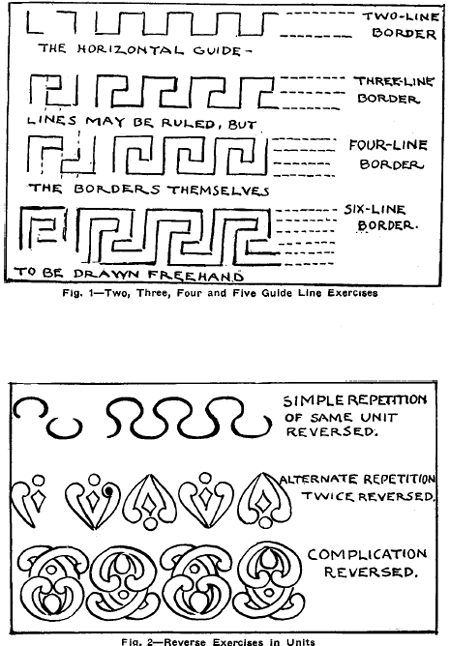
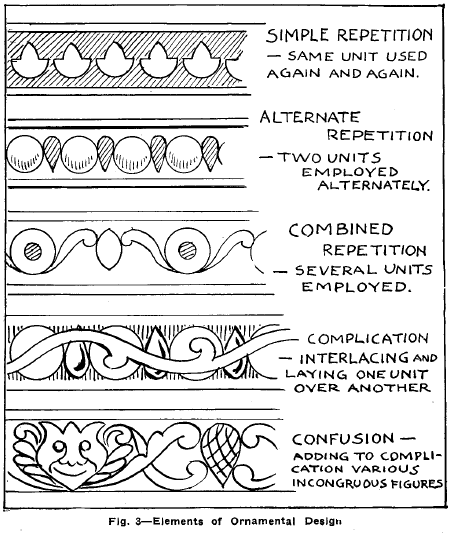
Decorative and Ornamental ArtDecoration relates to the production of beauty in art, in which the first principle to be considered is symmetry—the equal balance of two halves. The second principle is repetition. Repetition may be considered as Simple, when the same unit is used repeatedly. As Alternate, when two units are used alternately. As Combined, when several units (each one different) are used. Simple repetition, Alternate repetition and Combined repetition are seen in Fig. 2. Further complication appears in Fig. 3. Conventional DesignTo conventionalize means to represent by symbol of some exact preconceived outline, rather than by an attempt to duplicate resemblance to a natural object. To conventionalize, for instance, is to produce an ornamental design of such a character that it may be made up of several different integral parts, each of which is copied from some natural object, such as a leaf or flower, but which has been formalized into the typical rather than the correct representation of the original. Or, to give another instance, it may be a leaf made to con- . form to some geometrical figure, such as the maple leaf drawn within the confines of a hexagon. Even in pictorial art, liberties are taken with nature to overcome the limitations of human efforts to make certain visible impressions by pictorial means. Ornament.—In the ornamental designs of the Greeks and the Romans, Repetition and Alternation were the chief resources. Modern ornamenters added Intersection, which means relieving Repetition and Alternation at intervals with additional forms or group of forms, and then continuing as before. Complication also has been added. In decorative design, Complication is a term which differs somewhat from the ordinary meaning. It is here used to distinguish the results produced from the contact, interlacing of the various forms comprising the whole. Confusion is the term of another element that has a valued place in modern decoration. Confusion, usually the synonym of disorder, when applied to decorative art is used in giving contrast and even harmony to the general composition. The ornamentist in employing Confusion gains the aid of every possible object, whose curves or symmetrical lines appeal to his eye. He will thus group in one design the most incongruous figures, all of which give zest and life to an otherwise purely mechanical design. Confusion in designing ornament is the artist's license. The sculptor requires Confusion's aid, when he fills his pedestals, niches, etc., with ornaments imitated, at random it would almost seem, from the vegetable and animal world. Cardboard Curves
Cut out of cardboard or oil stencil board curved shapes similar to that herewith shown. They are useful in making designs where there is frequent repetition of simple curved lines. The complicated looking design on page 298 is an example of what can be done with a curve such as the one on this page.
Equilibrium and stability, commonplace in their aspect7 though they may seem, play important parts in the science of ornamental design. Solidity is a principle of art; strength does not exclude elegance. Duplication of Design.—When making a design in which the details are frequently duplicated, draw each minor detail and then make a tracing with a sharp-pointed soft pencil ; redraw the lines on the other side of the tracing paper, and with a stylus or whatever hard substance is used to make the offset rub briskly on the side opposite the last traced design. To duplicate the design wherever it is to be placed repeat each part of the design as often as necessary to produce the entire plan of ornament. In making a frame-like design make corner-pieces first and join to whatever border may be selected. Retracing Necessary.—When each "repeat" is to be made frequently, it will be necessary to retrace (over the same lines) several times, because a portion of the graphite, of which the pencil lead is composed, is transferred to the paper beneath at each offset. After three or four offsets, the transfers thus made will become too dim to act as guides. The plan for transferring as described in the chapter on Tracing and Transferring can be used in these exercises.
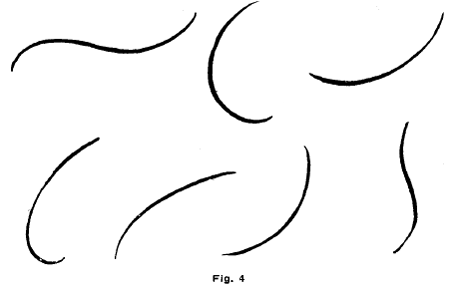
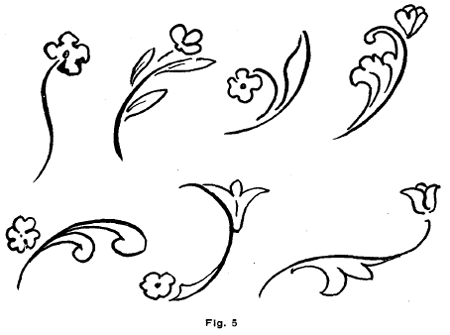
Aids for Imagination.—Draw curves similar to the above and add floral and decorative forms as suggested below. The intention of this exercise is to arouse the inventive faculties of the pupil. These devices may be drawn on the blackboard and the pupils requested to make totally different curves in addition. The curves should be all drawn separately and the decorations added afterward.
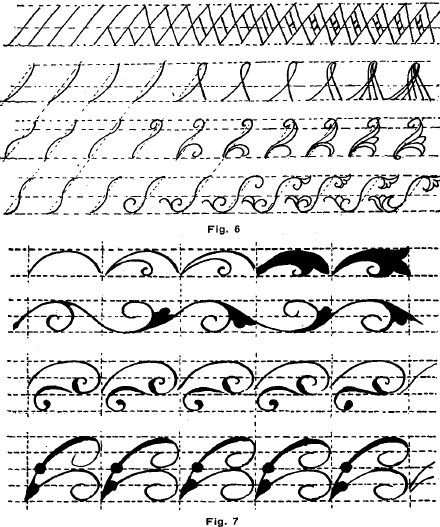
EXERCISES IN FIGS. 6 AND 7 Permit Use of Guide Lines.—Among the first exercises in drawing, practically the same principles may be applied that are applicable to the teaching of penmanship. Guide lines should be permitted ; that is, simple lines constructed along the horizontal and oblique sides. The exercises indicated at the beginning of each row of figures should be made the subject of a single lesson. The lines indicated at the right of each row should be added as the pupil advances ; for instance, let the pupil draw, say, a hundred straight, oblique lines, until he becomes proficient in their use. Follow with the reverse and duplicated lines in the top row. After that let him draw the simple curves at the left of the second row a great many times before he progresses to the added and duplicated, triplicated and quadrupled curves at the right. Next let him draw repeatedly the compound curves at the left in the third and fourth rows, before proceeding to the more complex additions at the right.
After the pupil has become proficient with the exercises in Fig. 6, let him draw the curves and ornamental devices in Fig. 7.
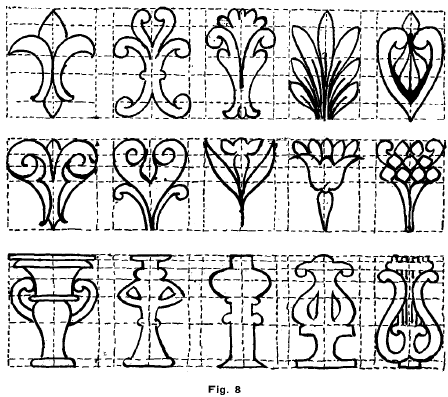
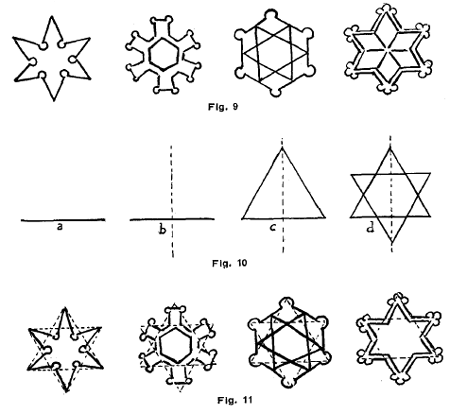
Each of the designs in Fig. 8 is enclosed in a rectangle of the same dimensions. There are three sets of horizontal lines, in turn bisected by vertical lines. Three sets of five totally different designs are based on these lines. Let them serve as an exercise by which they are copied as herewith given. When the pupils have made further progress let them make variations from these, using the same kind of guide lines, but with the endeavor to make new and original designs. Snow Crystals.—Fig. 9 shows four snow crystals greatly enlarged. They are formed by hexagons, or two equilateral triangles with apexes in opposition. To draw them by means of the latter proceed as in Fig. DD. Draw the horizontal line a. Bisect it as at b. Each oblique line in c equals the horizontal line a. Describe another triangle inverted as at d. Then proceed to construct the crystals on the lines of the triangles as shown in Fig. 11.
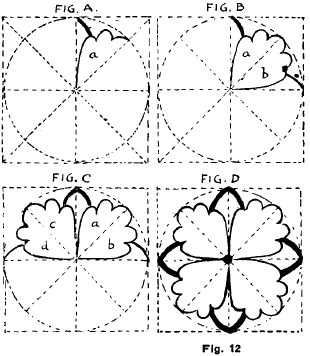
Rosettes with four or eight units or sections, as shown in Fig. D. Draw one-eighth of the entire design, as shown in Fig. A FIG at a. Reverse a, add b, in Fig. B, forming one-fourth of the rosette. Reverse this quarter, as shown in Fig. C, thus , forming half of the design. Reverse this once more and the design is completed, as shown in Fig. D. If an eight-point rosette is desired, add points as shown in heavy lines in Fig. D The reversing of the sections may be done by any of the following three methods: 1. Free-hand. 2. By folding according to the horizontal, vertical and oblique dotted lines in Fig. A. 3. By means of tracings of the obverse and the reverse (Fig. B), repeated with the aid of the stylus or other means of offsetting.
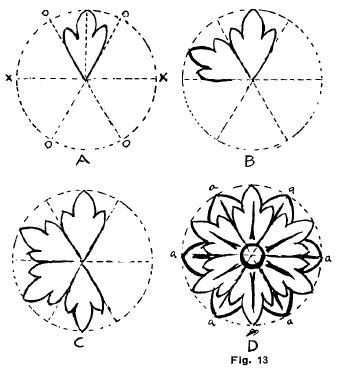
To Make a six or twelve-pointed rosette or medallion follow the rule for dividing the circle into six parts according to directions for making a hexagon in the chapter on Geometrical Forms Draw one unit of design and repeat according to directions for making the four or eight-pointed rosette. The four diagrams A, B, C and D in Fig. 13 are supposed to be one' drawing, but are shown as separate drawings in order to illustrate the successive steps for developing the rosette, as shown in Fig. D. The added six points A, A, A, A, A, A, need be made only if a twelve-point rosette is desired. XX, 0000 correspond to the letters in the diagram in the chapter on Geometrical Forms.
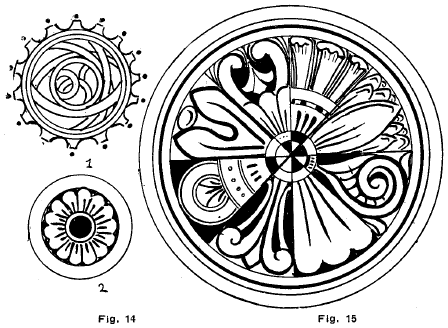
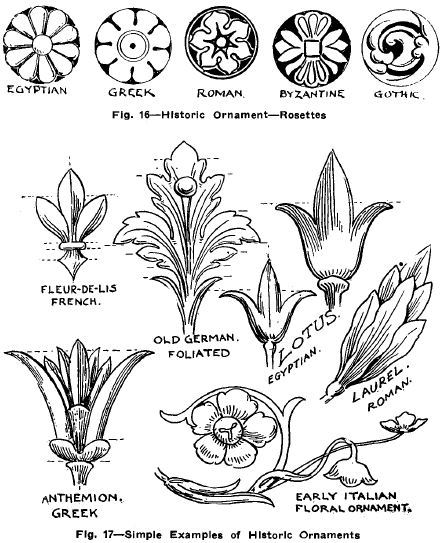
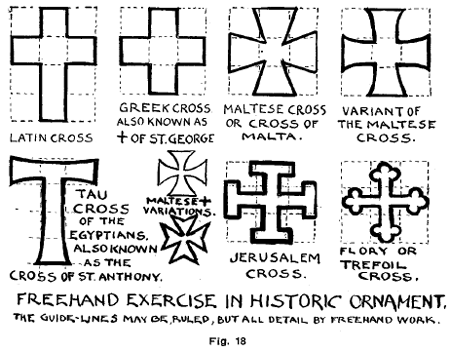
More Rosettes Fig. 14-1.—A geometrical rosette or medallion, drawn with a compass, except the external cog-like projections. Fig. conventionalized daisy in medallion form. Draw the circles with compass; the rest free hand. If pen and ink, sketch details with very light pencil lines. For exercise draw a border containing four rosettes, alternated or separated by a circle about one-fourth the diameter of the rosette. Fig. 15 is not intended as a copy for a single rosette, but for eight separate ones; each of the eight sections to be repeated eight times, when the circle will be filled. The units may be adopted also for border designs. Historic Ornament Individuality in ornament has been characteristic of most nations, even among the barbaric. Each nation seems to have adopted some unit or series of units and adapted them so repeatedly that they have derived a claim to some specific form of ornament. When these designs have passed down the ages they have been accepted as the historical ornament appertaining to the respective nations. The greatest historic styles of the ancients are the Egyptian, Greek and Roman. Of the Middle Ages there are the Byzantine, Romanesque (founded on the later forms of the Roman ornament and approaching the Gothic), Saracenic and Gothic.
The modern styles which, however, included those prevailing for several centuries past (since 15th century) are usually termed Renaissance, meaning literally, new birth, or the revival of anything which has been extinct or in decay. Previous to the Renaissance there had been a tendency to imitate in decoration the Byzantine and Gothic. The revival of Roman and Grecian art was called the Renaissance. Among the ancient styles are included, but as secondary, the Assyrian and Persian styles. There is today a ten6ency toward their revival. The Oriental styles are the Persian, (East) Indian, Chinese and Japanese.
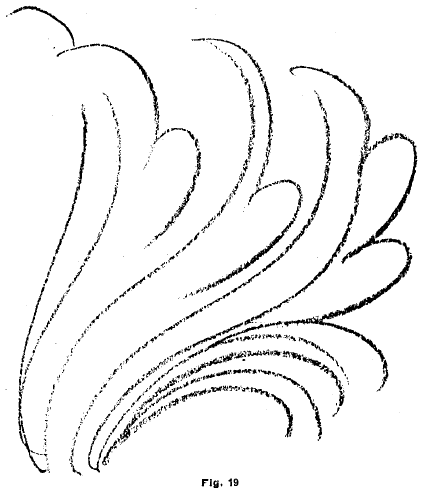
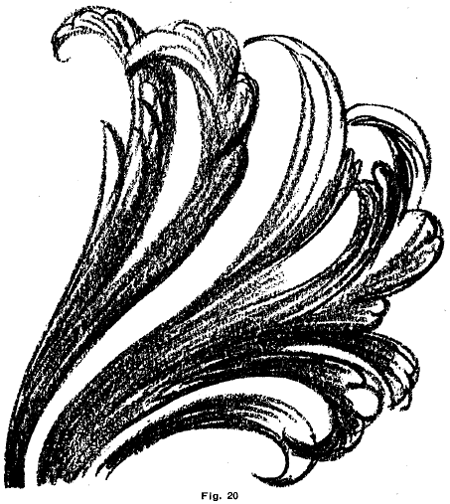
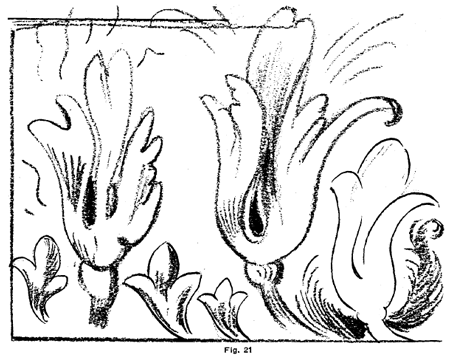
Graceful lines running in the same general direction is all that is aimed at in Figs. 19, 20 and 21 . The shading is to be added, with the same display of quick lines flowing along the same curves.
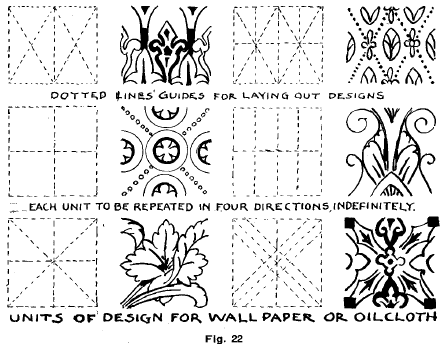
Wall-Paper and Oil Cloth Designing The principal requirement in a design for wall-paper or oil cloth is that the edges shall match each other ; that is, when the ends and sides are connected the entire design must appear connected and continuous. Therefore, the design must be made so that if it is repeated side by side, and end for end, a continuous, harmonious pattern will be observed. In the designs shown in Fig. 22 each unit is supposed to be the full width of a strip of wall-paper or oilcloth. They are drawn in conformity with the requirement noted. The height may be greater or less than the width, but the sides and ends must conform to the rule.
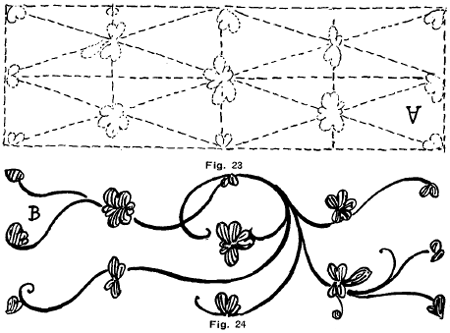
A Wall-Paper Design The casual observer would not be apt to guess that the design in Fig. 24 was based on the dotted line units in A, Fig. 23, placed in their regular order, aided by the oblique, horizontal and vertical lines of the diagram. Yet that is the man Tier in which the design is made. It will be interesting to see how readily the design B may be copied by resorting to the method of duplicating a drawing as shown in the chapter on Triangulation.
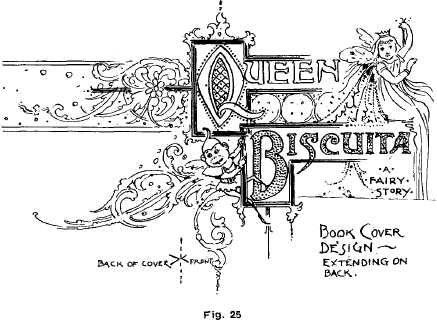
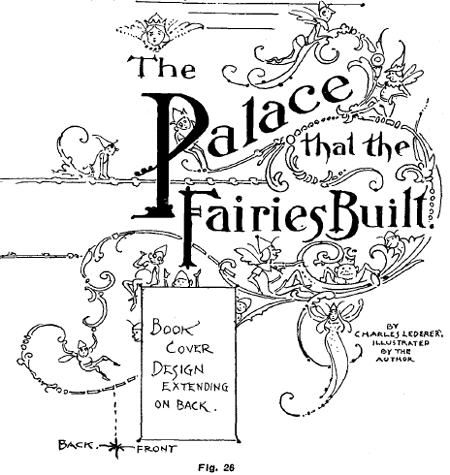
Corners and Borders.—In drawing corners and borders, guide lines must be made, especially parallel lines for the borders, so that the design will show evenly and straight, or in proper curves, according to the design used. Weaving Units.—A good method for practice is to make tracings of various simple units of ornamental design, weaving them by repetition into various compositions, and varying the component parts according to the judgment of the student. These tracings should be preserved for future use in other designs. Interspersing Units.—The various geometrical and ornamental figures shown may he broken, or separated, by interspersing flowers or units, such as leaves, or almost any of the conventional forms shown in this and other lessons. Book Covers and Posters Ornamental Lettering is often desirable, but it should not overshadow the main design of a book cover or poster. On the other hand, it is advisable to ornament the lettering in order to enrich the pictorial aspect of the design. Posters may have much ornamental detail, and, as in the case of a book cover, the more gracefully the letters are drawn, the better becomes the general effect of the entire combination. Simple Human Figures, harmoniously inclined, surrounded by graceful and ornamental design may be added, usually make a pleasing cover. It is necessary, however, to guard against an extravagant use of ornament, which is a common fault. ault. Designs for Book Covers should at all times avoid complexity, and the style and quality of the embellishment should not detract from the legibility of the lettering or the prominence of the main figure or scene introduced into the design, for if this occurs the result will be a bewildering confusion. Heavy Lines.—In drawing a poster or book cover, especially in the case of the former, let the lines be heavier than in an ordinary drawing. The drawing, completed, should be held off for inspection at a distance greater than would be usual with an ordinary drawing. Little defects that would appear upon a close view will seem to disappear, whereas much that in an ordinary drawing would not appear complex would, in the latter case, seem blurred and inexpressive. Simplicity is stronger at a distance; multiplicity of line and detail proportionately weaker.
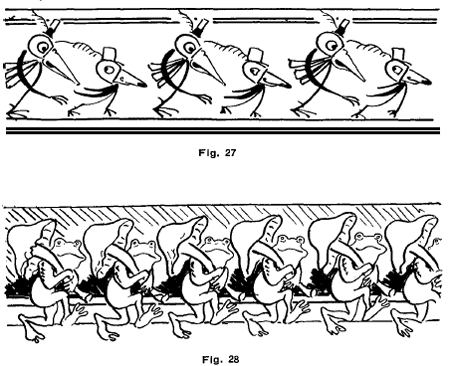
The comic figures in Figs. 27 and 28 are given importance as a border design simply by being repeated.
|
Privacy Policy ..... Contact Us


