







The studio should be a room not less than zo feet square ; one that is 20 feet wide and 3o feet long, or larger, is desirable. It should have a large window facing, if possible, slightly east of north ; this direction should be determined by the North Star, as the compass points due north in very few places. The studio should be at the top of the building in order to avoid reflections from other buildings, and its walls should be very high. Rooms are seldom high enough for studios, and it is customary to extend their height by means of a skylight which faces north and has a window 6 or 8 feet high above the ceiling.
The length of the studio should extend east and west so that the principal window may face north and be in the center of a long side. The principal window should be about to feet wide, or wider, and extend from near the floor to the ceiling, where it should connect with that of the skylight whose angle should be about 70°. The roof of the skylight should be inclined and meet the ceiling at about the center of the room, or farther back if the ceiling is low. By means of the skylight the necessary height may be given to any part of a room which is to be converted into a studio. There should be no mullions or large framework to divide the window, which should extend unbroken from the top of the skylight nearly to the floor. A room with simply a north window is very cheerless. If possible another window should be so placed that sunlight may enter the room ; it should be so curtained that the light may be completely excluded at will.
The principal window should be provided with two or three curtains arranged to draw up from the bottom, and another set should be secured at the top to draw downward. Thus light of any amount may be obtained from various directions. It is often desirable, especially when light reflects from other buildings, to soften the light by a screen made of cheese cloth or other thin white material, which may be arranged in the form of a curtain to roll or to slide upon wires. A curtain of this kind will often give a fair light when placed at a south window, but the north window gives the only light suitable for artists or students.
Such a studio is suitable for the artist and also for art classes, and when school buildings are designed, such special rooms should be planned for the drawing-rooms. When they are to be used for still-life work a shelf about is inches or 20 inches wide may be secured to the east wall about 22 inches from the floor, or shelves may be supported upon movable screens. Pupils should work most of the time with the light coming from above and at the left, but such a room will allow any arrangement of the group with reference to the light.
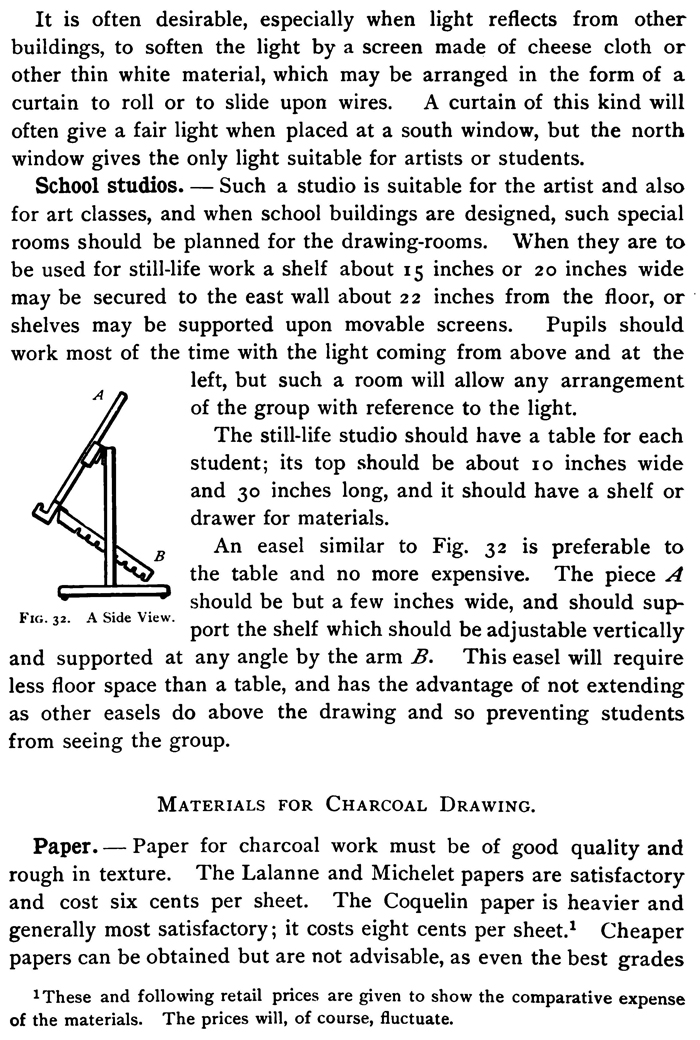
The still-life studio should have a table for each student; its top should be about io inches wide and 3o inches long, and it should have a shelf or drawer for materials. An easel similar to Fig. 32 is preferable to the table and no more expensive. The piece A should be but a few inches wide, and should support the shelf which should be adjustable vertically and supported at any angle by the arm B. This easel will require less floor space than a table, and has the advantage of not extending as other easels do above the drawing and so preventing students from seeing the group.
Paper for charcoal work must be of good quality and rough in texture. The Lalanne and Michelet papers are satisfactory and cost six cents per sheet. The Coquelin paper is heavier and generally most satisfactory; it costs eight cents per sheet. Cheaper papers can be obtained but are not advisable, as even the best grades 'These and following retail prices are given to show the comparative expense of the materials. The prices will, of course, fluctuate.
named are often so uneven in quality that uniform tones cannot be obtained. All these papers have watermarks in the form of straight parallel lines about an inch apart, which are seen most plainly when the sheets are held toward the light. When thus held the watermarked name of the paper is seen, and the side from which it is read is the right side of the paper and should always be used. The sheets are of uniform size about 19 inches by 25 inches. Whatman's cold-pressed paper may be used, but no paper is as satisfactory as the regular charcoal papers named.
There are many grades of charcoal of which only the best should be used, for with cheap grades, which are often gritty or brown, good results cannot be obtained. Good charcoal should give a perfectly black, smooth tint when rubbed into the paper with the finger. Every stick should be tried upon the edge of the paper in this way before it is used, and if it is gritty or uneven in texture or gives a brown tone, it should be broken and thrown away. When the sticks consist of round twigs the central part of a stick is often soft and brown while the outer parts are black ; care must be taken to avoid using sticks not black throughout.
The charcoal made in France by Cont6 of split twigs and called Fusains Venetien is very satisfactory. It is packed in boxes holding 5o sticks and costs about 45 cents a box. Extra hard charcoal in boxes holding so sticks, costing about 55 cents per box and labelled Fusains Vinetien Extra Dur, is prepared by Berville. The student will do well to obtain a box of this grade and, if necessary, a few sticks of a softer grade such as that first named.
The surface of a drawing board is unyielding and unsatisfactory to work upon for the grain of the wood and all irregularities of its surface indent the paper and injure the drawing. Instead of a drawing board, a canvas the size of the sheet of charcoal paper on which the drawing is made should be used, and the paper secured upon it by thumb tacks. Its yielding surface will help greatly to produce an artistic drawing. A portfolio may also be used as a board, and the paper secured to it by thumb clips, but it is not as satisfactory as the canvas. Paper may be stretched upon cloth secured to a stretcher or it may be stretched upon the frame without the cloth. When the drawing is completed it is then ready to be framed. It is best that paper upon a stretcher should have the protection of the cloth or canvas backing.
Crayons are sometimes used in finishing a charcoal drawing, as they are harder and more easily kept sharp. They give a deeper black than charcoal, but it is of a different nature, and the student is advised to work wholly with the charcoal or wholly with the crayon. Conte crayons in pencil form cost eight cents each, and come in five numbers, of which No. 2 is suitable for most work. Conte crayons in stick form about z inches long cost 18 cents a dozen and come in three grades. As crayon cannot be readily changed or erased, it is therefore a medium for the artist, and not suitable for the student.
Conte crayon sauce comes in rolls about inch in diameter and 2 inches long, costing six cents each. This sauce is applied with a stump, and although sometimes used in connection with charcoal, there is the same objection to its use as to the crayon pencil.
A charcoal drawing may be made wholly with the point of the charcoal and without any blending or rubbing of the tones ; or it may consist of tones produced by rubbing the charcoal into the paper with a stump. Both methods of work have been and are taught, and there are teachers who think that a drawing can be made in only one of these ways. The objection to the use of the stump is that students seem to think the stump will make the drawing if it is applied vigorously to the paper ; and as a result the surface of the paper is quickly destroyed by the stump so that no amount of work can produce a satisfactory drawing. When the point of the charcoal is used without the stump, the student is more likely to think of form. But to secure the best drawings it is not necessary that a drawing be made wholly by use of the point, and the best method is that which confines the pupil to no one way of working, but allows him to secure effects in the readiest ways.
These are made of gray paper in many sizes, and cost from 5 cents to 15 cents each ; they are intended to be used for producing even tones by blending the tones given by the charcoal point. If thus used they should be very lightly applied to the paper, for if any pressure is applied they will quickly destroy its surface.
Leather stumps of chamois skin are made in many sizes, and cost from 6 cents to 4o cents each ; they are intended to be used to produce even tones by rubbing crayon sauce upon paper, and are necessary when this medium is chosen. If pressure is applied when any stump is thus used it will quickly spoil the paper, and the student is advised not to use a stump for rubbing the charcoal, and also not to use crayon sauce, which necessitates the use of the stump for this purpose. Any blending required in a charcoal drawing is best given by rubbing lightly with the finger the tint placed upon the paper, taking care that the finger is not moist from perspiration. The stump is most valuable not for its intended purpose, but used as an eraser. A clean stump will lift the charcoal from a place too small to allow the finger to be used upon it and will prove very valuable ; it may be cleaned by pressing and twisting it into bread.
These are small stumps about 3 inches long and of an inch diameter, and cost ten cents per dozen. They may be made by tightly rolling charcoal paper into the form of a sharp-pointed pencil. They are very valuable, as they may be used as an eraser for picking out small lights and for refining and softening sharp edges, and in fact for any drawing where a part is to be lightened instead of darkened. Various means of erasing are described as follows.
The finger. — When it is required to soften or lighten masses or any details not too small, the finger is the best eraser, but it cannot be used to obtain a very light detail within a mass of dark. The finger may be cleaned by rubbing it upon cloth or, better still, upon bread.
A large surface may be lightened quite quickly and uniformly, especially when the drawing is in its first stages, by blowing strongly upon it ; and a small part may be lightened by blowing upon it through a tube, which may be readily obtained by rolling a sheet of paper.
Fresh bread made without lard or other oily substance is the eraser most satisfactory and generally used in charcoal work, as it will quickly remove the charcoal from the paper without the slightest injury to its surface. It may be rolled into pointed stump-like pieces, by which small lights may be taken out, and it is preferable to a sharp-pointed eraser because it does not indent the paper and because it produces a light which is not too keen-edged for artistic drawings.
Any dark may be lightened by rapping the paper with a pencil or other hard object so that the particles of charcoal are set in motion and caused to fall from the paper.
This eraser is made in the form of a lead pencil, and is the best form of rubber eraser for light and shade work, as the wood keeps the rubber from becoming soiled and makes it convenient to draw with. If the paper is worked upon so long that bread will not remove the dark from any part which should be light, it may be necessary to use a rubber pencil eraser.
This is a sharp-pointed rubber ink-eraser ; by giving it a thin wedge-shaped point it may be used to produce a narrow light when the paper has been worked upon so long that the bread will not lighten it sufficiently. It should be used with care so as not to indent the paper, and only when the bread or kneaded eraser will not answer. The artist may sometimes use in place of this eraser a sharp knife, with which the lights are scratched out, but pupils should not be advised or allowed to use the knife, which at best does not improve the drawing. It requires much skill to use a knife without spoiling a drawing.
This is an eraser consisting of rubber which may be worked into any form as if it were a piece of bread ; it is soft, pliable, does not injure the paper, and resembles bread so much in its results that it may be used in its place, thus avoiding the dirt occasioned by the use of bread.
A common cloth or chamois skin may be used as an eraser, but the student is advised to use the means previously explained in preference, as these force the charcoal into the grain of the paper so thoroughly that unless the surface is afterwards worked over with the charcoal point there is not enough variety of tone, and consequently the drawing lacks atmosphere.
The tones of a charcoal drawing consist of fine black powder, which, as has been explained, is readily shifted about or removed from the surface of the paper, and in order to preserve the sketch it must be fixed or varnished when it is completed, with a liquid called fixatif. Good fixatif should be very light-colored, and should dry upon the hand so as to be quite adhesive just before it is dry, but it should leave no powder upon the hand. Inferior grades of fixatif are often sold, of which several times the quantity that should be required may be used without fixing a drawing, but often producing a surface of powder upon the drawing, which spoils it.
Fixatif may be made by adding to a pint of the best alcohol about 4 ounces of the white shellac liquid varnish, and allowing it to stand until the upper part becomes a clear amber color, when this clear part may be poured into another bottle. The fixatif may be used before it has settled, but upon the best drawings only the clear fixatif should be used. There should not be enough shellac in the fixatif to cause it to be very sticky, for this will make the drawing shine and will spoil it.
Any common atomizer will serve to spray the fixatif upon the drawing, but those with fine tubes will be clogged with the gum if they are not cleaned with alcohol each time they are used. The best atomizer is one made of two large folding tin tubes and costing 25 cents. The atomizer may be used to spray the fixatif upon the drawing, or the fixatif may be applied to the back of the drawing with a brush. To use the atomizer the drawing should be placed horizontally upon a table. The atomizer should be held far enough from the drawing so that no large drops will reach it, and the spray should be directed above it so that it falls gently upon the drawing. If the atomizer is near the drawing or the spray strikes it forcibly the charcoal will be moved about on the paper and the drawing will thus be spoiled. A little fixatif should be blown upon the drawing, which should then be allowed to dry, for if the surface of the paper becomes wet the drawing will be spoiled. When the lighter parts have been fixed so that the charcoal will not rub off upon the finger or cloth, a hole should be cut in a piece of paper so that fixatif may be blown through
it upon the darker parts without striking the lighter parts. No more fixatif should be applied to any part than is required to hold it, for the drawing will be spoiled if varnished so that it shines.
The charcoal is most apt to be blown or floated from its proper position in the first stages of fixing, so very little should then be applied without waiting for it to dry. To apply fixatif with the brush, the drawing must be secured in a horizontal position, face downward, with nothing underneath it that may touch it. It may be tacked to any frame or stretcher, or opposite edges may be secured to wooden strips. Care must be taken not to rub the drawing while thus securing it. The fixatif should be applied to the back of the drawing with a brush about 3 inches wide. The drawing will thus be fixed without danger of injury by drops or by making the drawing shine. The paper should remain horizontal until thoroughly dry. Fixatif applied to the back should be stronger than that which should be used upon the front of the drawing.
The first work in charcoal should be the quick sketching of simple groups of still life composed of objects of different colors; but if students have not had sufficient practice to enable them to draw in outline correctly, they may work from single objects, testing their values, as explained in this book, and the drawing, as explained in " Free-Hand Drawing." These time-sketches should be upon half-sheets of charcoal paper, and not even the youngest pupils should use paper smaller than a quarter-sheet, for charcoal is not suited to small drawings.
It is impossible for the student to realize the effect of his drawing if it is not held as far as possible from him and at right angles to the direction in which he looks upon it ; and while drawing, the arm should always be outstretched, for if much bent, it will be so cramped that free work cannot be done, and it will also cause the eyes to be too near the drawing. Even at arm's length the student will fail to realize the errors of the drawing, and he should remember to place it beside the group often and study both from a distance.
The hand or sleeve should not be allowed to rest upon the paper, for this will spoil its surface, and if the sleeve or hand rest upon the drawing, it will be erased. If the hand cannot be held steadily enough to obtain the fine details, it may be rested upon a ruler or other form of mahl-stick held in the left hand so as to rest against the right-hand edge of the iiketcher.
The student who has studied outline drawing for some time before beginning light and shade will be able to plan and place his drawing to good advantage upon the paper without blocking in its principal proportions by light touches connecting the prominent corners in its contour ; but those who are not able to do this may suggest the space the drawing is to occupy by very light charcoal touches, forming the blocking-in lines illustrated on page I I of " Free-Hand Drawing." The height and width may then be measured and changed if necessary, and then within the space thus obtained the student may work as directed. Students are advised, however, not to draw these lines, but to simply think of them while blocking in the masses of dark which take the place of the lines and determine the proportions of the group.
Great care must be taken that students do not work upon the objects one at a time, drawing an object, then its shadow, and then its surroundings. This mechanical work can be avoided only by insisting upon any shadow and its adjoining cast shadow being put in of uniform value at once, and all such masses in the group being thus suggested in a time so short as to forbid study of details in these masses.
Before beginning to draw, the pupil should nearly close his eyes or in some other way blur his vision, so as to see simply the effect of the group, — its masses of light and dark. He should study the masses of dark long enough to decide their forms, positions, and relations, and should then begin his drawing by lightly suggesting the darks and as quickly as possible placing upon the paper tints which represent the masses of dark, without regard to whether they are produced by dark local color or by shadows with their adjoining cast shadows. He should use a piece of charcoal of medium grade, of perfectly smooth quality, and of pure black color, and he should not sharpen it, but with its side should place wide tints adjoining each other and producing tones as nearly uniform as possible. The charcoal should be passed regularly and rapidly along the surface, producing a tint by both the upward stroke and the downward stroke. The direction of strokes throughout the entire drawing should be about the same, but the direction is of no importance as long as it is not unpleasantly noticeable in the effect. The masses may be laid in by using a short stub of charcoal placed flat on the paper.
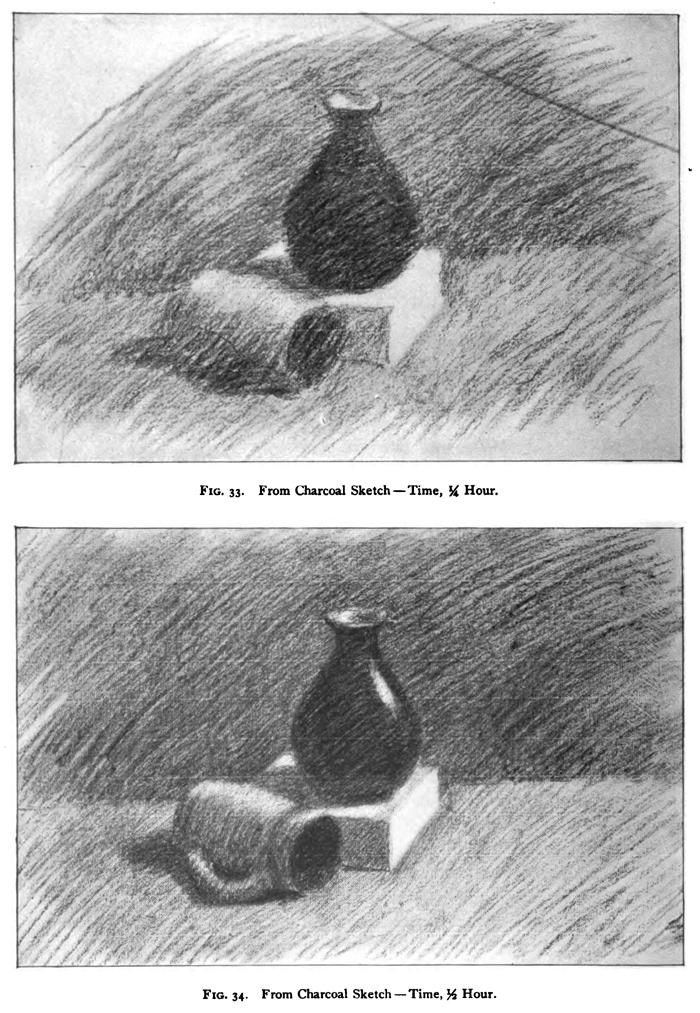
The first stage of the drawing should consist of hatchings, suggesting the masses of dark more lightly than in Fig. 33, and not bounded by outlines. Thus in Fig. 33 the dark masses are those of the dark vase and its cast shadow, the shadow and cast shadow of the mug, and the shadow of the plinth. The student should not spend over five minutes in suggesting these masses, and should not separate the cast shadows from the shadows. When these masses are lightly suggested, their proportions may be tested by measuring the height and width of the whole group ; and if not correct the proportions' should be changed, increasing the strength of the tones as this is done.
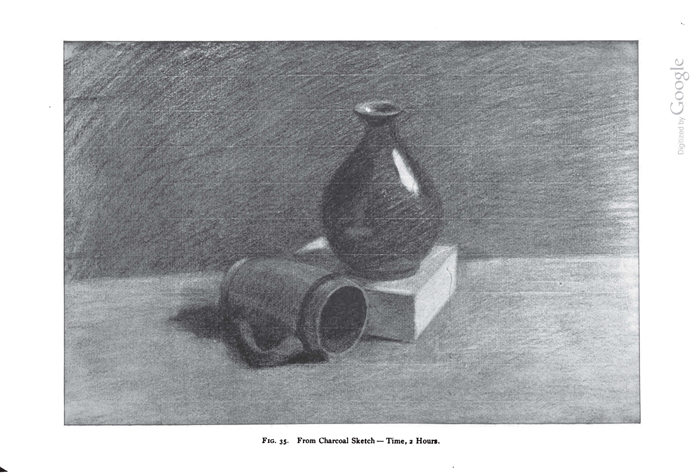
The second stage of the drawing is shown by Fig. 33, and is obtained by putting in the background and strengthening the darks to bring out the cast shadows. The student should not draw outlines or determine contours except as they come from gradually developing the forms of the masses of the different values. In doing this the charcoal should be carried over the objects across the contours and the background as often as possible, in order that sharp outlines may not destroy the effect of atmosphere, which comes from the contrast of tones only. The student should be able to produce the second stage of the rendering of a simple subject, such as Fig. 35, in not over fifteen minutes, for if he works slowly, he will be thinking of outlines and details instead of effects and masses : and if he begins thus, he will continue to work mechanically for the unimportant, without obtaining the essentials. Students have been so generally taught to make an outline drawing before beginning to shade that many find it very difficult not to think about outlines; but if they do not force themselves to cover the paper so as to suggest the principal masses, as in Fig. 33, in a few minutes, they will never be able to forget outlines and work freely and artistically.
When the masses have been given, as in Fig. 33, all tests needed to prove form and proportions to be correct should be applied, and any corrections required should be made not by drawing outlines, but by shifting the tones and gradually strengthening them until the general effect becomes as strong as is necessary. The more important details should then be suggested, and the third stage, represented by Fig. 34, results. If the form must be changed by lifting a dark tone, bread may be used ; in this way the glitter light on the vase was obtained and some of the background tone removed to give the light face of the plinth. Rapid time-sketches should be made until students can give the effect of a simple group with as much detail as Fig. 34 represents, in not over half or three-quarters of an hour ; when able to do this, they should learn how to carry the drawing farther, as shown by Fig. 35.
In Figs. 33 and 34 the charcoal is simply hatched upon the paper, no blending being given by the stump or the finger, but tones as atmospheric as possible being obtained directly by the use of the stick of charcoal. But if any part of such a drawing is worked upon with the finger or in any other way so that the grain of the paper is thoroughly filled, the blending thus produced will make the rough texture found elsewhere in the drawing unpleasant, and so necessitate an equal amount of finish in all other equally important parts of the drawing.
Any drawing which is to represent much detail will require that the grain of the paper, which is not filled when a time-sketch such as Fig. 34 is made, be filled by working over the entire surface of the paper. This may be done when the paper is not very rough by using the fine point of the charcoal to fill in all parts not touched in the first use of the charcoal ; but this method is very slow and unsatisfactory, for the parts which require the most study and the use of the eraser will have a different texture from the other parts of the drawing. When a drawing is to be carried farther than Fig. 34, the best way is to fill in the grain of the paper after the drawing is in the state illustrated by Fig. 33 by going over all the surface of the paper with the finger used lightly as a stump, applying just pressure enough to work the charcoal into all the depressions of the paper. If the finger is moist, it
should first be dried by rubbing it upon charcoal hatched near the edge of the paper.
It is especially important that the finger be passed over all the contours of the objects, for if the grain of the paper is not worked upon at the contours as much as elsewhere, an atmospheric effect cannot be produced. The student must not draw outlines in any stage of a light and shade drawing, or positively place contours until the very end. Then he will not be afraid of losing outlines or of going over the contours as they are suggested in Fig. 34.
The student must not omit to work over the entire surface of the paper, even that of the lightest parts ; thus the side of the plinth or of any lighter object, supposing such to be in the group, must receive a light tint and as much rubbing as any other part, for the lightest surfaces have gradation upon them, and an atmospheric drawing cannot be made if the grain of the paper upon these parts is not worked upon as much as elsewhere.
It may often be necessary to place a tint upon a light surface and then remove it, in whole or in part, in order to destroy the grain of the paper and produce a tint as light as is desired.
When the grain of the paper has thus been equally worked upon and thoroughly filled throughout, the student may work upon the resulting tones with the point of the charcoal and with that of the tortillon or rolled bread or kneaded eraser, drawing details and perfecting values. It will not be necessary for further rubbing to be done, or the finger or stump used except as an eraser to lighten parts made too dark.
In thus finishing the drawing a long piece of hard charcoal should be used which is sharpened to a wedge-shaped point, similar in form to that of a pencil used for mechanical drawing, in order that the point may wear longer than a conical point. It must be sharpened upon sandpaper or a file. A short piece of charcoal should be placed in a crayon holder.
The student must aim to use the charcoal point so as to obtain just the right form and value for every part, and he should use the point of the tortillon or other eraser to obtain narrow lights. By means of these different points he should carefully work all detail into place upon the foundation given by rubbing with the finger the drawing illustrated by Fig 34.
There must be no very sharp edge or keen separations in the drawing. This is very difficult for students to realize ; often they wish to lay a straight-edged piece of paper down along the edges of a plinth, for instance, and then use the eraser along the paper to produce a straight-edged contour. If properly taught that a free-hand outline drawing must be made entirely free-hand and so that its lines do not resemble those given by the use of a straight edge, they would not expect to make a good light and shade drawing in such a way ; for they would understand that no mechanical aid nor mechanical accuracy is permissible in an artistic representation of even the most geometric and exact object. An artistic drawing must have the variety in both line and tone which results from free-hand drawing upon a surface slightly yielding and not pefectly smooth. There must, however, be a definite representation or separation of such parts as the edges of the plinth and other objects.
If the sharp line given by using the eraser along the straight edge is slightly blended by using the tortillon stump, the effect will be improved, and if edges not quite straight which come from use of the charcoal point free-hand are too sharp (as often they will be), the point of the tortillon may be used to blend them slightly and thus give a separation which is decided and also soft enough to be artistic. The student must remember that there are no outlines in nature, and that he cannot in light and shade artistically represent objects by outlining them either with dark or with light. The only parts where there should be the effect of a line are the parts which represent very narrow shadows or very narrow lights. Under the plinth in Fig. 17 is a shadow which gives the effect of a line and which must be represented, and so must all similar details of dark or of light ; but no object is completely or even largely outlined by such effects, and no work of art true to nature can be outlined, for outlines are pure conventions. Hence the student should not begin a light and shade drawing by outlines for they will be worked out of the effect with difficulty. In no part must the contours be defined by keen-edged tones, and the tortillon stump must always be used to soften all separations that have become too sharp.
There must be variety in all drawings, and so in charcoal work in some parts the contours must be more sharply drawn than in others ; these are the parts which are accented by keen lights, strong shadows, and by strong contrasts, and they must be more prominent than the contours which are more or less lost in the masses of light or the masses of shadow. These sharper parts of the drawing are its accents, but they will not be noticed if all parts are made quite sharp. It will not do to have contours uniformly sharp even if they are not very keen, for this will produce a hard and mechanical effect. On the other hand, it will not do to have all contours and definitions uniformly soft, for this will produce an unpleasant and characterless effect.
The photographs may assist the student to understand the above remarks. Fig. 14 represents contours and details by almost uniform sharpness, and is far less pleasing than Fig. 20, in which the contours are decided in parts and almost lost in other parts. These figures illustrate the fact that a photograph as well as a drawing may be mechanical and hard through uniform sharpness of definition, or may be pleasing and artistic through variety of definition and subordination of detail.
In any study the lines or details of the background or other unimportant parts should not be made as prominent as in Fig. 14, but should be suggested as slightly as in Fig. zo, or omitted altogether, in order that the time may be spent in study of the detail of the objects which form the group and are important.
Fig. 36 is from a charcoal drawing upon which several days were spent. The light was directly overhead, and the plaster rosette was very dark in color from age, so that the drawing seems dark; it is, however, quite true to nature in values.
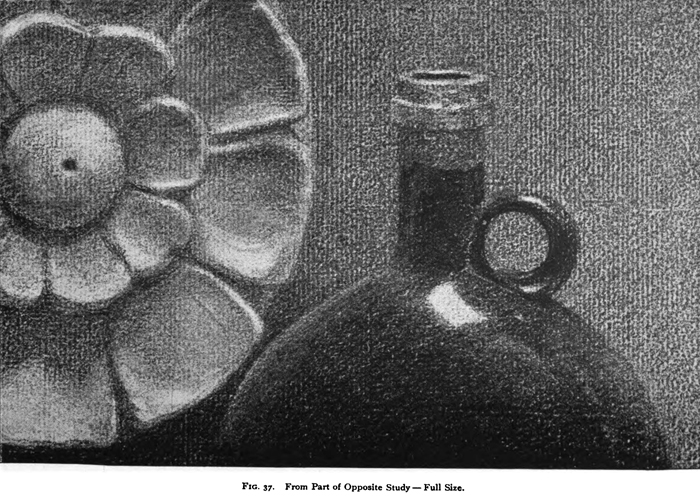
Fig. 37 gives, full size, a part of the rosette and bottle of Fig 36, and shows the texture produced by working as explained. To produce the best effect of atmosphere the grain of the paper should show about as strongly as in this figure. It is not necessary to completely work out the watermarks of the parallel lines unless they come in parts where much fine detail is to be represented.
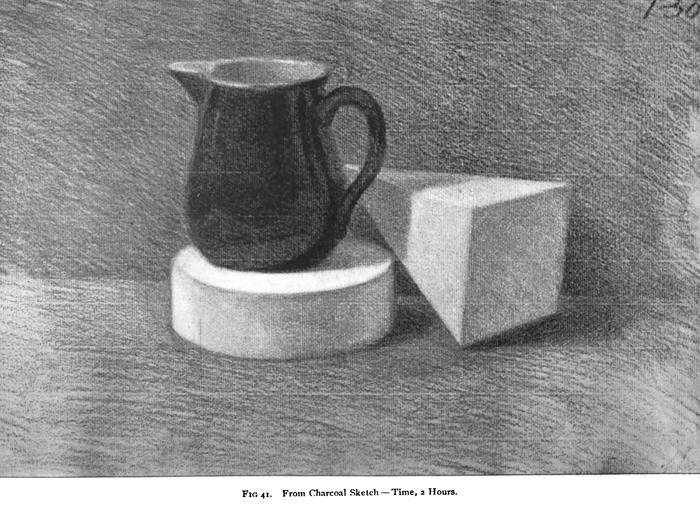
Figs. 35, 39, and 41 are from two-hour time-sketches by first-year art-school students ; they illustrate the work which is of greatest value to the art student. He should be satisfied to begin to study as explained, and should continue to make time-sketches until able to represent such groups as well or nearly as well as these figures, so far as values and drawing are concerned, before attempting to paint or make highly finished drawings. The student who attempts to paint or make finished drawings when not able to see masses and values, will waste his time and produce simply childish or mechanical drawings without breadth or effect.
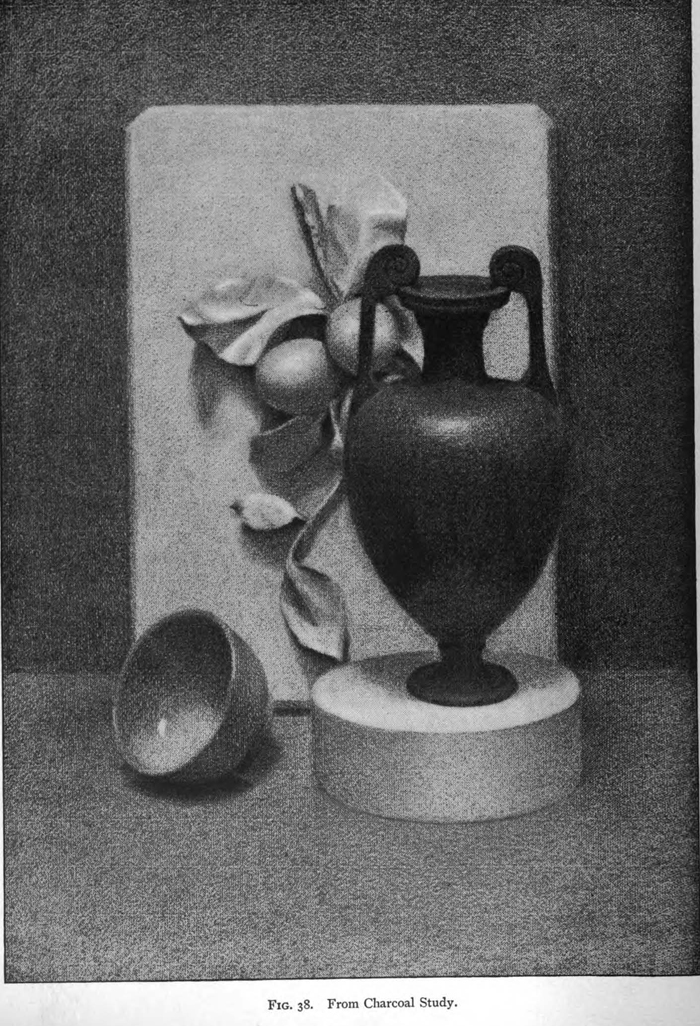
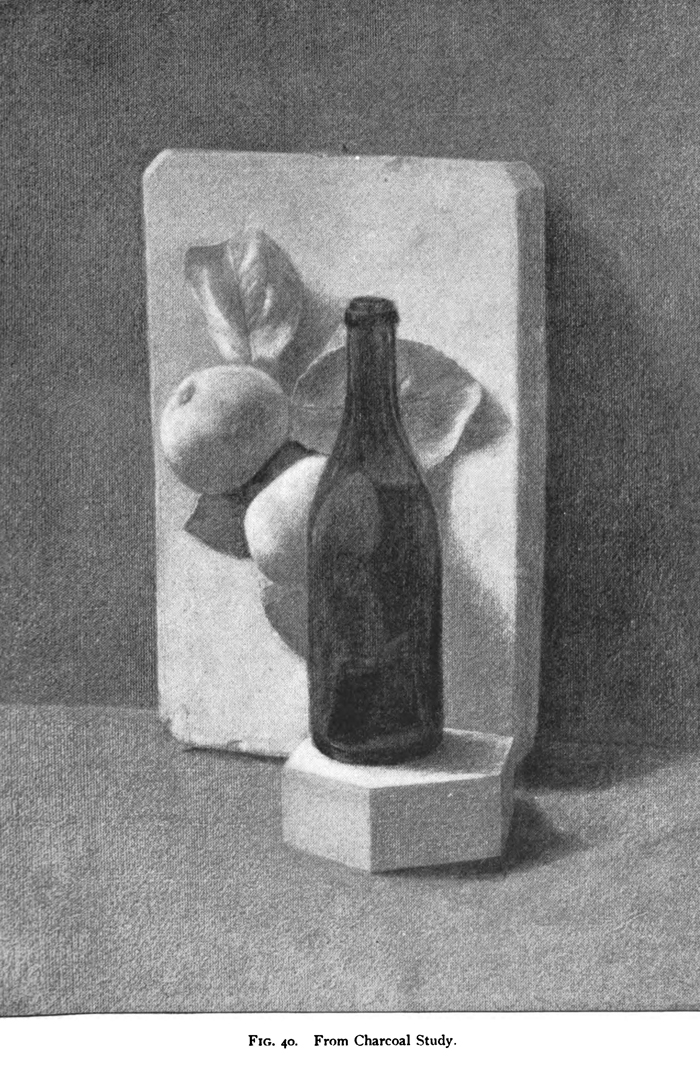
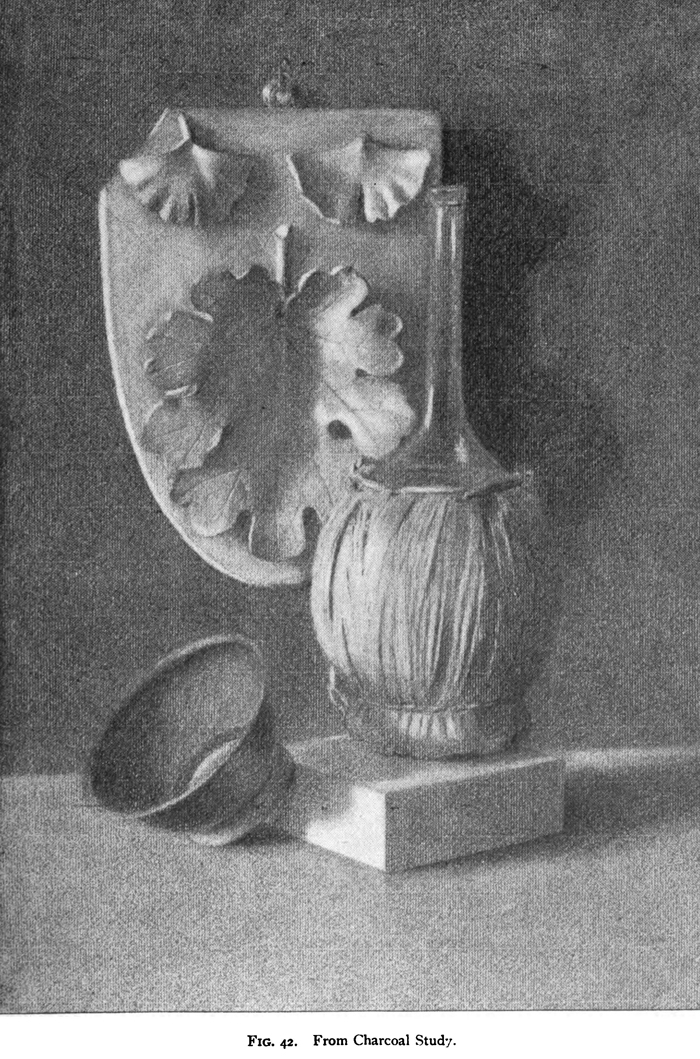
Figs. 36, 38, 4o, and 42 are from drawings upon full-size sheets of charcoal paper by students of the entering class of the Massachusetts Normal Art School. They illustrate the work the students should learn to do after they are able to make good time-sketches. The reproductions are not quite true in values to the originals, but they show the careful study of masses and details which students should be led to make in order to obtain a good foundation for more advanced work. All who intend to study painting should first study values in charcoal from still life, for this study will do more for the beginner than any other work ; it will give him knowledge which he may be many years in obtaining if he begins painting without the foundation of drawing and values.
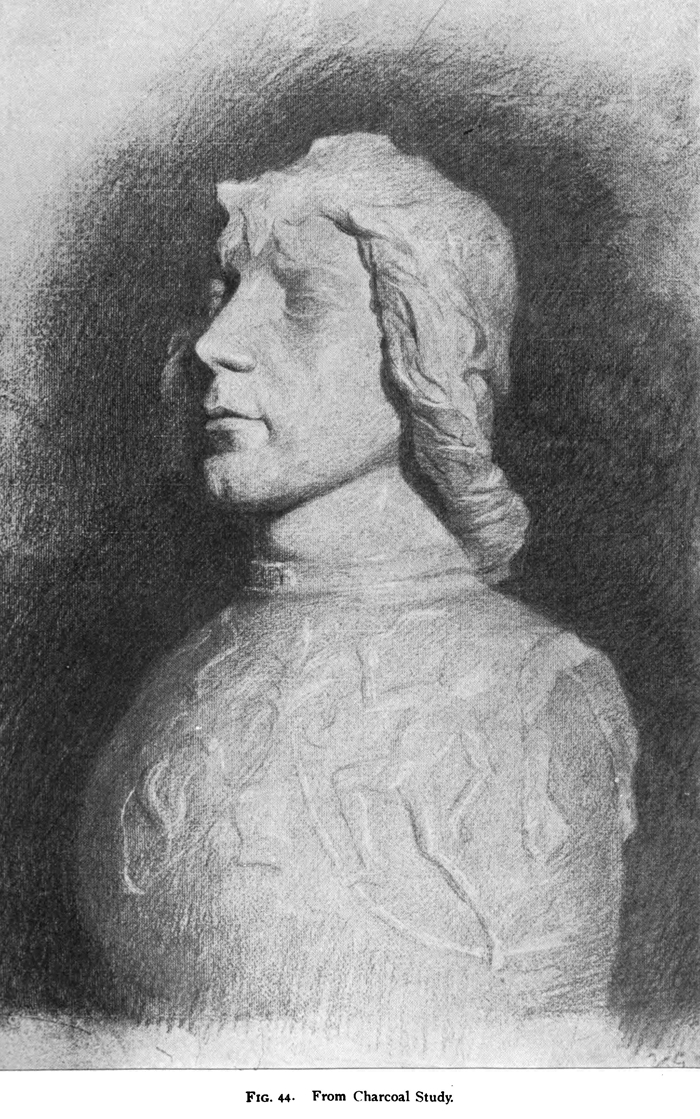
After this study of still life which enables the student to see form and values, he may draw from the antique such subjects as Figs. 43 and 44 ; after this work, he may draw from life; and finally he may study painting, beginning with still life which will prepare for the painting of the head and figure.
Artists often use gray paper and put in the lightest parts with white chalk, but the student is earnestly advised to use simply white paper and charcoal, and to use his judgment as to when to apply the various methods explained for erasing and changing the drawing and the values, remembering that all methods may at different times be serviceable, particularly those first on the list.
When the student can draw he may combine different methods and mediums in the same drawing, and use as much latitude as the artists of the past display in the work they have left for us to study, and which we will study to our great advantage if wise enough to profit by our opportunities.