Home > Directory of Drawing Lesson > Human Face > Drawing the Solid Forms of Children From the Sides and Backs
Drawing Children : How to Draw Kids Sides and Backs and Their Solid Forms
|


[The above words are pictures of text, below is the actual text if you need to copy a paragraph or two]
THE SOLID FORM, SIDE AND BACK
In the side view of a child we observe that the body has two strongly contrasted lines — the front and back lines of the body section.
The line of the back is nearly straight, curving in slightly perhaps, and leaning slightly forward, while the line of the front of the body curves boldly outward, more in the lower part than in the upper, so that the thickest part of the body is toward the lower end.
This difference is due largely to the rigid bony structure at the back and at the front.
The top of the thigh goes up to a point called the hip, and the upper back part of the thigh is a full curve, forming what is called the gluteal section. All the parts are larger at the upper than at the lower end. Notice that the front of the thigh, as it ends in the knee, extends down lower than the back of the thigh where it joins the calf of the leg. Observe that the lower end leg sets down into the foot, in this view. carefully the proportion the foot bears whole limb.
Side views of the arm will be found in Fig. 27 and Fig. 28.
In Fig. 29 we have the side view of the entire child-figure. The outline of the body section. where hidden by the other parts, is indicated in this drawing by dotted lines. to show the proper attachment of the limbs.
Give particular attention to the form of the body at the lower end do not en ITV the abdominal line down without paying respect, to the different plane at the lower end which always marks the pubic section Fig. 29.
plainly to be seen in side and front view. The front outline of the young child's body is called an unbroken curve —this refers particularly to the abdominal line—that part between the chest and pubic section.
When the baby is seated, this abdominal part is a soft section which pushes up against the chest section or down upon the thighs, making it seem difficult for the little fellow to get at his toes. When standing still, this abdominal section has a tightened or firm outline, and projects well forward.
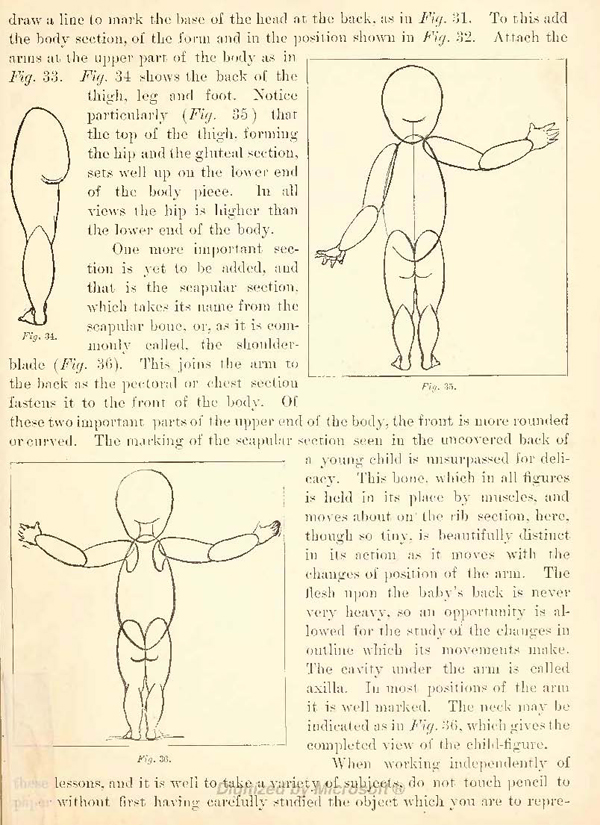
The drawing of the back of the child-figure is usually found more difficult by beginners than the front or side— perhaps because the outline of the body section is lost with the head and limbs. It may he easier therefore if, at first, the entire outline of the body be left as if seen through the arms and thighs. Until these parts are rightly placed; then the lapping sections of the body outline which should not show.
In the first place, make the head an egg-shaped oval as before (Fig. 10). then draw a line to mark the base of the head at the back, as in Fig. 31. To this add the body section, of the form and in the position shown in Fig. 32. Attach the arms at the upper part of the body as in Fig. 33. Fig. 34 shows the back of the thigh, leg and foot. Notice particularly (Fig. 35 ) that the top of the thigh. forming the hip and the gluteal section, sets well up on the lower end of the body piece. In all views the hip is higher than the lower end of the body.
One more important section is yet to be added, and that is the scapular section. which takes its name from the scapular bone, or, as it is commonly called. the shoulder-blade (Fig. 36). This joins the arm to the back as the pectoral or chest section fastens it to the front of the body. Of these two important parts of the upper end of the body, the front is more rounded or curved. The marking of the scapular section seen in the uncovered back of a young child is unsurpassed for delicacy. This bone. which in all figures is held in its place by muscles, and moves about on the rib section, here, though so tiny. is beautifully distinct in its action as it moves with the changes of position of the arm. The flesh upon the baby's back is never very heavy. so an opportunity is allowed for the study of the chancres in outline which its movements make. The cavity under the arm is called maxilla. In most positions of the arm it is well marked. The neck may be indicated as in Fig. 36, which gives the completed view of the child's figure.
When working independently of lessons, do not touch a pencil to a piece of paper without first having care ally studied the object which you are to represent, so that every drawing you make will be a clear expression of your idea, regarding the form of its subject.
In drawing the human figure it will not answer merely to imagine or guess at the form and position of the parts; you must really know these facts and be familiar with all the details.
In whatever you attempt, never let the difficulties appear to you greater than the beauties.
Never make a drawing merely for the purpose of showing you can accomplish a difficult piece of work.
Seek to discern and preserve some delicacy. or strength. or beauty, or meaning, that will call for all your skill, and be worthy its best effort.


